ServerStatus-Rust在CloudFlare Tunnel的安装与配置
ServerStatus是一款我一直在使用的探针程序,相比竞品有着轻量化的特性,而原版以及很久没更新了,最近发现有大佬使用Rust重写了该软件,支持了更多功能,以下是官方Github的介绍。
ServerStatus威力加强版,保持轻量和简单部署,增加以下主要特性:
使用 rust 完全重写 server、client,单个执行文件部署
多系统支持 Linux、MacOS、Windows、Android、Raspberry Pi
支持上下线和简单自定义规则告警 (telegram、wechat、email、webhook)
支持 http 协议上报,方便部署到各免费容器服务和配合 cf 等优化上报链路
支持 cloudflare tunnels 和 mTLS 部署
支持主机分组动态注册,简化配置
支持 vnstat 统计月流量,重启不丢流量数据
支持 railway 快速部署
支持 systemd 开机自启
其它功能,如 🗺️ 见 wiki
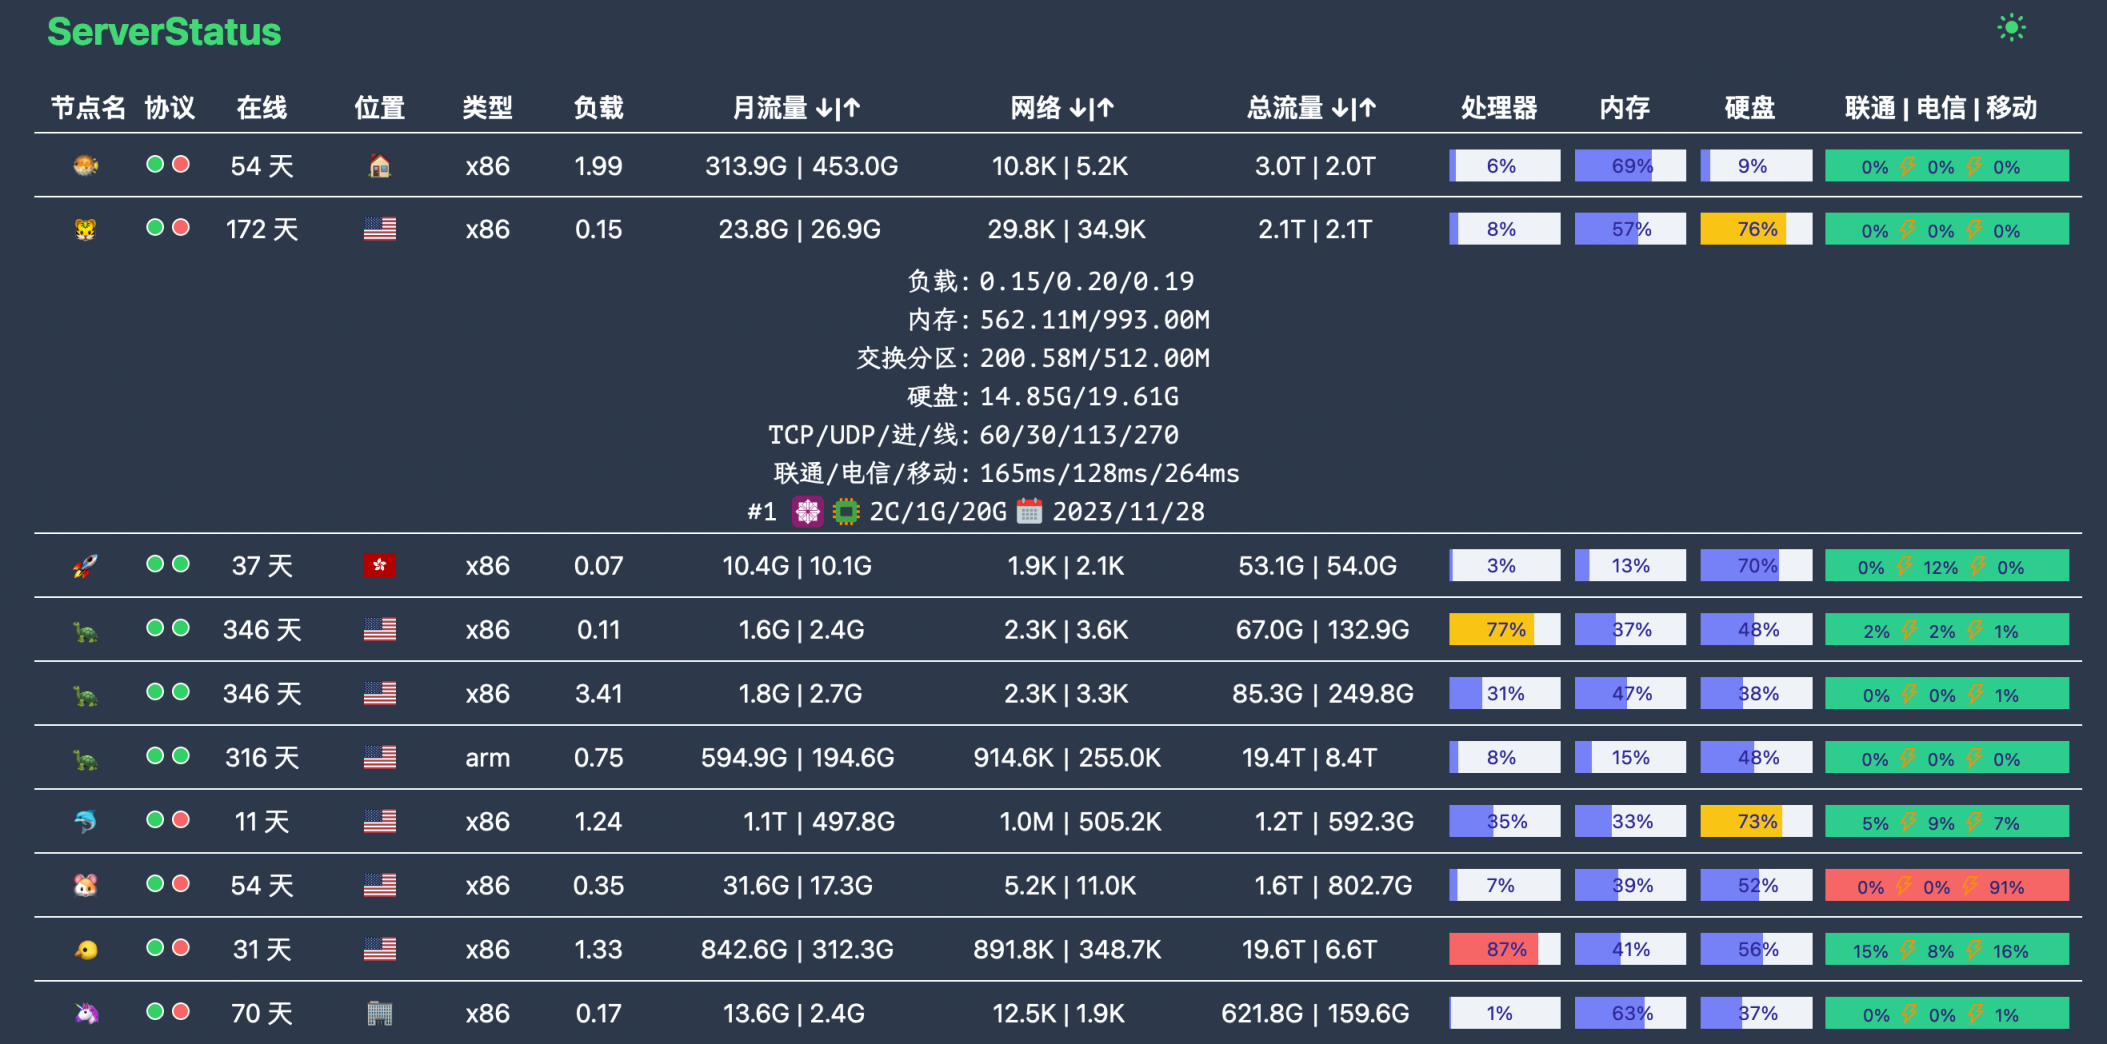
可以看到官方明确支持使用CloudFlare Tunnel进行部署,在这个部署模式下可以将源站保护在CloudFlare CDN后面,并且大部分的小鸡都是在国外的,和CloudFlare的连接性基本不会有问题,因此强烈推荐以该模式部署。
安装服务端
推荐使用官方的脚本安装,通过wget命令下载。
wget --no-check-certificate -qO status.sh 'https://raw.githubusercontent.com/zdz/ServerStatus-Rust/master/scripts/status.sh'该脚本可以安装服务端也可以安装客户端,先介绍服务端的安装。
# 安装 服务端
bash status.sh -i -s该脚本会在/opt/ServerStatus/server/下生成服务端可运行文件以及一份默认配置,并且自动生成守护进程。
root@host:/opt/ServerStatus# ls -lh /opt/ServerStatus/server/
total 3.3M
-rw-r--r-- 1 root root  15K Mar 27 22:13 config.toml
-rwxr-xr-x 1 root root 3.3M Mar 18  2024 stat_server
root@host:/opt/ServerStatus# systemctl status stat_server.service
● stat_server.service - ServerStatus-Rust Server
     Loaded: loaded (/etc/systemd/system/stat_server.service; enabled; preset: enabled)
     Active: active (running) since Thu 2025-03-27 22:13:26 CST; 35min ago
   Main PID: 4001519 (stat_server)
      Tasks: 8 (limit: 9483)
     Memory: 18.7M
        CPU: 7.508s
     CGroup: /system.slice/stat_server.service
             └─4001519 /opt/ServerStatus/server/stat_server -c /opt/ServerStatus/server/config.toml

Mar 27 22:13:26 host systemd[1]: Started stat_server.service - ServerStatus-Rust Server.
Mar 27 22:13:26 host stat_server[4001519]: ✨ stat_server v1.8.1 (1dd5c41, 2024-03-18 14:18:45 UTC, rustc 1.76.0, x86_64-unknown-linux-musl)
Mar 27 22:13:26 host stat_server[4001519]: ✨ run in normal mode, load conf from local file `/opt/ServerStatus/server/config.toml
Mar 27 22:13:26 host stat_server[4001519]: ✨ admin_user: ***
Mar 27 22:13:26 host stat_server[4001519]: ✨ admin_pass: ********
Mar 27 22:13:26 host stat_server[4001519]: 🚀 listening on http://0.0.0.0:8080
Mar 27 22:13:26 host stat_server[4001519]: 🚀 listening on grpc://0.0.0.0:9394 + TLS
配置文件参考
# 侦听地址, ipv6 使用 [::]:9394
grpc_addr = "0.0.0.0:9394"
http_addr = "0.0.0.0:8080"
# 默认30s无上报判定下线
offline_threshold = 30
# 开启 grpc TLS, 0:关闭 1: TLS 2: mTLS
grpc_tls = 0
# 证书最终路径 ${workspace}/${tls_dir}, 包含 server.pem, server.key 文件
tls_dir = "tls"
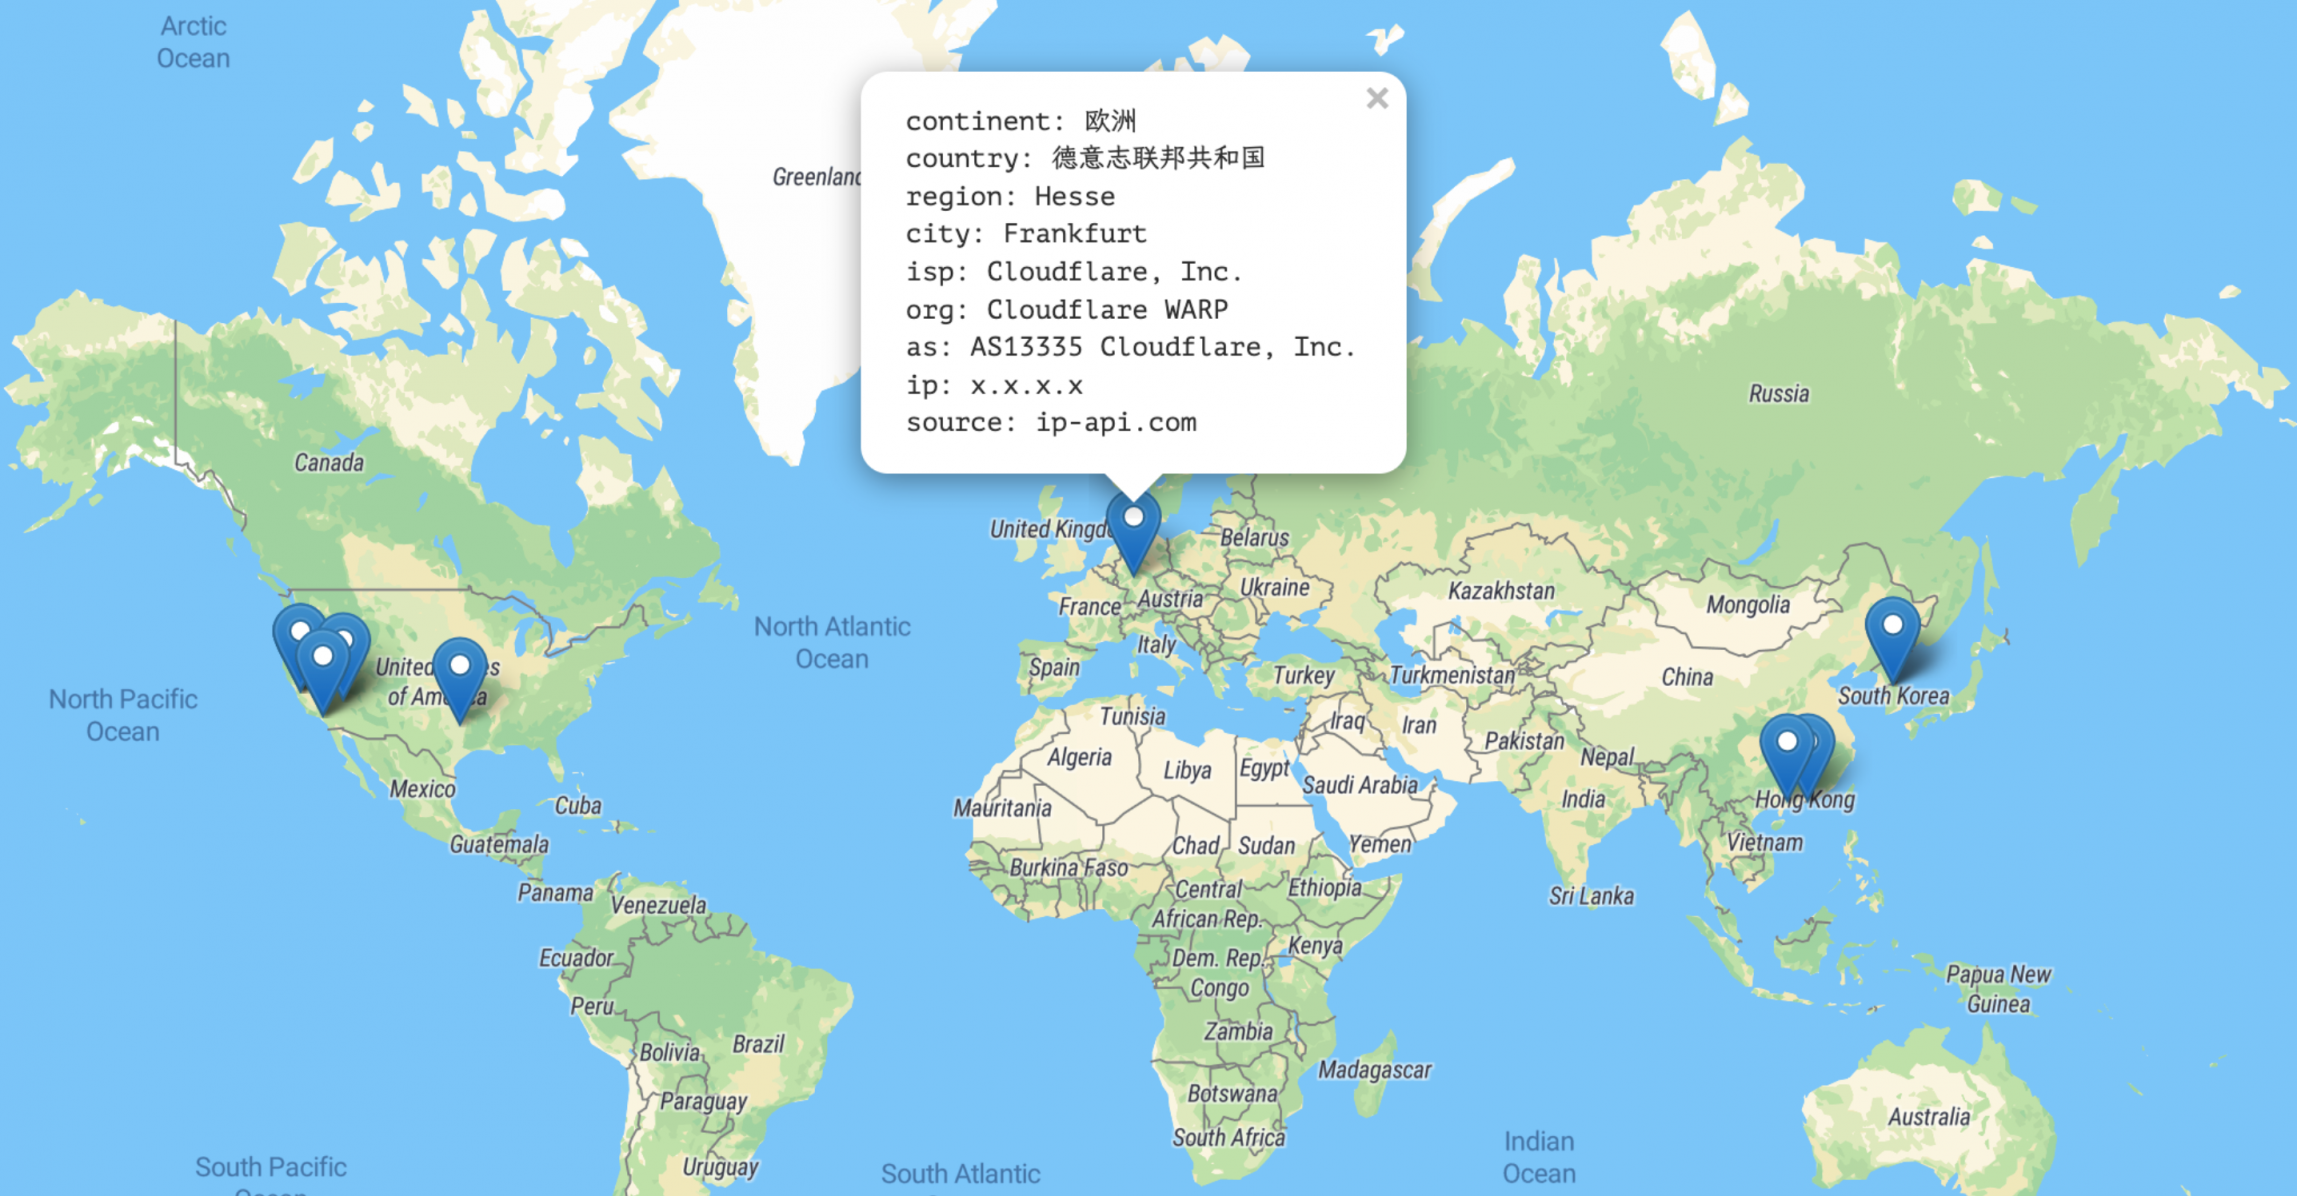
# 管理员账号,不设置默认随机生成,用于查看 /detail, /map
jwt_secret = "" # 修改这个, 使用 openssl rand -base64 16 生成 secret
admin_user = ""
admin_pass = ""
# hosts 跟 hosts_group 两种配置模式任挑一种配置即可
# name 主机唯一标识,不可重复,alias 为展示名
# notify = false 单独禁止单台机器的告警,一般针对网络差,频繁上下线
# monthstart = 1 没启用vnstat时,表示月流量从每月哪天开始统计
# disabled = true 单机禁用
# location 支持国旗 emoji https://emojixd.com/group/flags
# 或国家缩写,如 cn us 等等,所有国家见目录 web/static/flags
# 自定义标签 labels = "os=centos;ndd=2022/11/25;spec=2C/4G/60G;"
# os 标签可选,不填则使用上报数据,ndd(next due date) 下次续费时间, spec 为主机规格
# os 可用值 centos debian ubuntu alpine pi arch windows linux macos android freebsd
hosts = [
{name = "h1", password = "p1", alias = "n1", location = "🏠", type = "kvm", labels = "os=freebsd;ndd=2022/11/25;spec=2C/4G/60G;"},
{name = "h2", password = "p2", alias = "n2", location = "🏢", type = "kvm", disabled = false},
{name = "h3", password = "p3", alias = "n3", location = "🏡", type = "kvm", monthstart = 1},
{name = "h4", password = "p4", alias = "n4", location = "cn", type = "kvm", notify = true, labels = "ndd=2022/11/25;spec=2C/4G/60G;"},
# 最小化配置
{name = "mac", password = "pp", alias = "macos"},
{name = "pi", password = "pp", alias = "pi", labels = "os=pi"},
{name = "win", password = "pp", alias = "windows"},
{name = "android", password = "pp", alias = "android", labels = "os=android"},
]
# 动态注册模式,不再需要针对每一个主机做单独配置
# gid 为模板组id, 自动注册唯一标识,不可重复
# eg. ./stat_client -a "http://127.0.0.1:8080/report" -g g1 -p pp
hosts_group = [
# 可以按国家地区或用途来做分组
{gid = "g1", password = "pp", location = "🏠", type = "kvm", labels = "os=centos;ndd=2022/11/25;spec=2C/4G/60G;"},
{gid = "g2", password = "pp", location = "🏢", type = "kvm", notify = true},
# 例如不发送通知可以单独做一组
{gid = "silent", password = "pp", location = "🏡", type = "kvm", notify = false},
]
# 动态注册模式下,无效数据清理间隔,默认 30s
# 这个设置要比较通知间隔 notify_interval 大,不然收不到告警通知
group_gc = 30
# !!! 一键部署如果没问题则不需要动,Server 会自行根据你的域名生成 server_url
# 修正一键部署,请自行替换 ssr.rs 为你的域名,
# server_url = "https://ssr.rs/report"
# stat_client 默认安装的路径
workspace = "/opt/ServerStatus"
# 不开启告警,可忽略后面配置,或者删除不需的通知方式
# 告警间隔默认为30s
notify_interval = 30
# https://core.telegram.org/bots/api
# https://jinja.palletsprojects.com/en/3.0.x/templates/#if
[tgbot]
# 开关 true 打开
enabled = false
bot_token = "<tg bot token>"
chat_id = "<chat id>"
# host 可用字段见 payload.rs 文件 HostStat 结构, {{host.xxx}} 为占位变量
# 例如 host.name 可替换为 host.alias,大家根据自己的喜好来编写通知消息
# {{ip_info.query}} 主机 ip, {{sys_info.host_name}} 主机 hostname,见 server_status.proto
title = "❗<b>Server Status</b>"
online_tpl = "{{config.title}} \n😆 {{host.location}} {{host.name}} 主机恢复上线啦"
offline_tpl = "{{config.title}} \n😱 {{host.location}} {{host.name}} 主机已经掉线啦"
# custom 模板置空则停用自定义告警,只保留上下线通知
custom_tpl = """
{% if host.memory_used / host.memory_total > 0.5 %}
<pre>😲 {{host.name}} 主机内存使用率超50%, 当前{{ (100 * host.memory_used / host.memory_total) | round }}% </pre>
{% endif %}
{% if host.hdd_used / host.hdd_total > 0.5 %}
<pre>😲 {{host.name}} 主机硬盘使用率超50%, 当前{{ (100 * host.hdd_used / host.hdd_total) | round }}% </pre>
{% endif %}
"""
###################### tgbot end ##########################
## 可选 单纯记录 event 到日志文件,调试自定义告警使用
[log]
enabled = false
log_dir = "/opt/ServerStatus/logs"
tpl = """{% set obj = dict(event=event, host=host, ip_info=ip_info, sys_info=sys_info) %} {{ obj | tojson}}"""
###################### log end ##########################
## 可选 微信通知
[wechat]
enabled = false
corp_id = "<corp id>"
corp_secret = "<corp secret>"
agent_id = "<agent id>"
title = "❗Server Status"
online_tpl = "{{config.title}} \n😆 {{host.location}} 的 {{host.name}} 主机恢复上线啦"
offline_tpl = "{{config.title}} \n😱 {{host.location}} 的 {{host.name}} 主机已经掉线啦"
custom_tpl = """
{% if host.memory_used / host.memory_total > 0.8 %}
😲 {{host.name}} 主机内存使用率超80%
{% endif %}
{% if host.hdd_used / host.hdd_total > 0.8 %}
😲 {{host.name}} 主机硬盘使用率超80%
{% endif %}
"""
###################### wechat end ##########################
## 可选 邮件通知
[email]
enabled = false
server = "smtp.gmail.com"
username = "[email protected]"
password = "***"
to = "[email protected];[email protected]"
subject = "ServerStatus Notification"
title = "❗<b>Server Status</b><br/>"
online_tpl = "{{config.title}} 😆 {{host.location}} 的 {{host.name}} 主机恢复上线啦"
offline_tpl = "{{config.title}} 😱 {{host.location}} 的 {{host.name}} 主机已经掉线啦"
custom_tpl = """
{% if host.memory_used / host.memory_total > 0.8 %}
<pre>😲 {{host.name}} 主机内存使用率超80%, 当前{{ (100 * host.memory_used / host.memory_total) | round }}% </pre>
{% endif %}
{% if host.hdd_used / host.hdd_total > 0.8 %}
<pre>😲 {{host.name}} 主机硬盘使用率超80%, 当前{{ (100 * host.hdd_used / host.hdd_total) | round }}% </pre>
{% endif %}
"""
###################### email end ##########################
## 可选 webhook
# 理论上支持所有支持 webhook 的软件,如 Discord、 Slack、 飞书、 企业版微信(WorkWechat)、 钉钉(DingTalk)等。
# webhook 调用基本上都差不多,差异只在最后返回的 json 结构,根据各自的 api 文档自行构建相应的 json 结构即可。
# script 使用脚本引擎 https://rhai.rs/book/
[webhook]
# 总开关
enabled = false
# 可多个 webhook.receiver
[[webhook.receiver]] # 通用型 webhook
# 局部开关
enabled = false
# https://webhook.site/#!/2b1ad731-45fe-49a8-ae91-614167019db2
url = "https://webhook.site/2b1ad731-45fe-49a8-ae91-614167019db2"
headers = { content-type = "application/json", x-data = "y-data" }
# headers = { content-type = "text/plain" }
# 可选 HTTP Basic Auth
username = "u"
password = "p"
timeout = 5 #s
# 简单发送一个 json 对象,#{} 为 Object 对象, [] 为数组
# 最终结果, 固定结构 [是否发送通知,结果对象]
script = """[true, #{config: config, event: event, host: host, ip_info: ip_info, sys_info:sys_info} ]"""
[[webhook.receiver]] # Discord
enabled = false
# https://discord.com/developers/docs/resources/webhook
url = "https://discord.com/api/webhooks/xxxxxxxxxxxxxxxxxxxxxxx"
headers = { content-type = "application/json" }
timeout = 5 #s
script = """
let message = "";
switch event {
"Custom" => { // 自定义事件
let threshold = 10;
let msgs = [];
let memory_usage = round(host.memory_used * 100.0 / host.memory_total);
if memory_usage > threshold {
msgs.push(`😲 ${host.location} ${host.name} 主机内存使用率超${threshold}%, 当前 ${memory_usage}%`);
}
let hdd_usage = round(host.hdd_used * 100.0 / host.hdd_total);
if hdd_usage > threshold {
msgs.push(`😲 ${host.location} ${host.name} 主机硬盘使用率超${threshold}%, 当前 ${hdd_usage}%`);
}
message = join(msgs, "\\n");
},
"NodeDown" => { // 掉线
message = `😱 ${host.location} ${host.name} 主机已经掉线啦`;
},
"NodeUp" => { // 上线
message = `😆 ${host.location} ${host.name} 主机恢复上线啦`;
}
}
// 返回的 json 结构,#{} 为 Object 对象, [] 为数组
// 最终结果, 固定结构 [是否发送通知,结果对象]
[message.len() > 0, #{ embeds: [ #{
title: ":bell: ServerStatus-Rust :bell:",
fields: [
#{ name: "Event", value: event, },
#{ name: "Datetime", value: now_str(), },
#{ name: "Message", value: message, },
]
}]}]
"""
[[webhook.receiver]] # Slack
enabled = false
# https://api.slack.com/messaging/webhooks
url = "https://hooks.slack.com/services/xxxxxxxxxxxxxxxxxxxxxxx"
headers = { content-type = "application/json" }
timeout = 5 #s
script = """
let message = "";
switch event {
"Custom" => { // 自定义事件
let threshold = 80;
let msgs = [];
let memory_usage = round(host.memory_used * 100.0 / host.memory_total);
if memory_usage > threshold {
msgs.push(`😲 ${host.location} ${host.name} 主机内存使用率超${threshold}%, 当前 ${memory_usage}%`);
}
let hdd_usage = round(host.hdd_used * 100.0 / host.hdd_total);
if hdd_usage > threshold {
msgs.push(`😲 ${host.location} ${host.name} 主机硬盘使用率超${threshold}%, 当前 ${hdd_usage}%`);
}
message = join(msgs, "\\n");
},
"NodeDown" => { // 掉线
message = `😱 ${host.location} ${host.name} 主机已经掉线啦`;
},
"NodeUp" => { // 上线
message = `😆 ${host.location} ${host.name} 主机恢复上线啦`;
}
}
// 最终结果, 固定结构 [是否发送通知,结果对象]
[message.len() > 0, #{text: message}]
"""
[[webhook.receiver]] # WorkWechat
enabled = false
# https://developer.work.weixin.qq.com/document/path/91770
url = "https://qyapi.weixin.qq.com/cgi-bin/webhook/send?key=xxxxxxxxxxxxxxxxxxxxxxx"
headers = { content-type = "application/json" }
timeout = 5 #s
script = """
let message = "";
switch event {
"Custom" => { // 自定义事件
let threshold = 80;
let msgs = [];
let memory_usage = round(host.memory_used * 100.0 / host.memory_total);
if memory_usage > threshold {
msgs.push(`😲 ${host.location} ${host.name} 主机内存使用率超${threshold}%, 当前 ${memory_usage}%`);
}
let hdd_usage = round(host.hdd_used * 100.0 / host.hdd_total);
if hdd_usage > threshold {
msgs.push(`😲 ${host.location} ${host.name} 主机硬盘使用率超${threshold}%, 当前 ${hdd_usage}%`);
}
message = join(msgs, "\\n");
},
"NodeDown" => { // 掉线
message = `😱 ${host.location} ${host.name} 主机已经掉线啦`;
},
"NodeUp" => { // 上线
message = `😆 ${host.location} ${host.name} 主机恢复上线啦`;
}
}
// 最终结果, 固定结构 [是否发送通知,结果对象]
[message.len() > 0, #{
msgtype: "text",
text: #{
content: message
}
}]
"""
[[webhook.receiver]] # Bark
enabled = false
# https://github.com/Finb/Bark
# https://day.app/2021/06/barkfaq/
url = "https://api.day.app/push"
headers = { content-type = "application/json; charset=utf-8" }
timeout = 5 #s
script = """
let message = "";
switch event {
"Custom" => { // 自定义事件
// 使用率阈值,这里是磁盘 超 70% 告警
let threshold = 70;
let msgs = [];
let memory_usage = round(host.memory_used * 100.0 / host.memory_total);
if memory_usage > threshold {
msgs.push(`😲 ${host.location} ${host.name} 主机内存使用率超${threshold}%, 当前 ${memory_usage}%`);
}
let hdd_usage = round(host.hdd_used * 100.0 / host.hdd_total);
if hdd_usage > threshold {
msgs.push(`😲 ${host.location} ${host.name} 主机硬盘使用率超${threshold}%, 当前 ${hdd_usage}%`);
}
message = join(msgs, "\\n");
},
"NodeDown" => { // 掉线
message = `😱 ${host.location} ${host.name} 主机已经掉线啦`;
},
"NodeUp" => { // 上线
message = `😆 ${host.location} ${host.name} 主机恢复上线啦`;
}
}
// 最终结果, 固定结构 [是否发送通知,结果对象]
[message.len() > 0, #{
// 标题
title: "ServerStatusRust",
// 告警内容
body: message,
// 修改成你的设备 key, app 内获取
device_key: "fLLBrV****kM5H",
// 后面为可选字段参考 https://github.com/Finb/bark-server/blob/master/docs/API_V2.md
// 其它角标, 铃声, icon, 参考 app 里面的说明即可
badge: 1,
sound: "minuet.caf",
icon: "https://day.app/assets/images/avatar.jpg",
group: "SSR",
url: "https://github.com/zdz/ServerStatus-Rust"
}]
"""
###################### webhook end ##########################官方默认的配置文件如上所示,其中必须修改的项为:
jwt_secret:使用openssl rand -base64 16生成后填入""中间hosts数组:该数组定义了可连接的设备信息,password必须修改复杂一点的密码,密码不可带特殊符号。
其中建议修改的项为:
[log]选项中enabled = false改为enabled = true, 如果硬盘空间有富裕,建议启用日志功能,方便后续排障所有通知中的
host.name改为host.alias,告警通知可读性会更强。启用TG通知:
enabled = true
bot_token = "<tg bot token>"     <==<tg bot token>改为bot得token,可通过Botfather使用/mybots命令查询
chat_id = "<chat id>"            <==<chat id>改为需要被通知的账号与bot的聊天ID,在需要通知的账号上先发起一句对bot的聊天,
                                    然后通过https://api.telegram.org/bot{token}/getUpdates,将{toke}更改为你的bot token,
                                    即可得到如"chat":{"id":89******8,"first_name":"xxx","username":"xxx","type":"private"}的回显,
                                    其中id即为需要的chat_id
如果要使用CloudFalre Tunnel,需要将
grpc_tls = 0改为grpc_tls = 1,启用grpc的tls,虽然我个人试了下不启用也能使用CloudFalre Tunnel反代http://127.0.0.1:9394,但是依旧推荐按照官方配置来。在没部署证书的时候,grpc端口会起不来,接下来介绍如何生成证书与配置CloudFalre Tunnel。
CloudFlare Tunnel部署流程
其实这个是有官方教程的,但是官方教程写的有一点问题,本文根据我的成功案例来描述如何配置。
基础配置
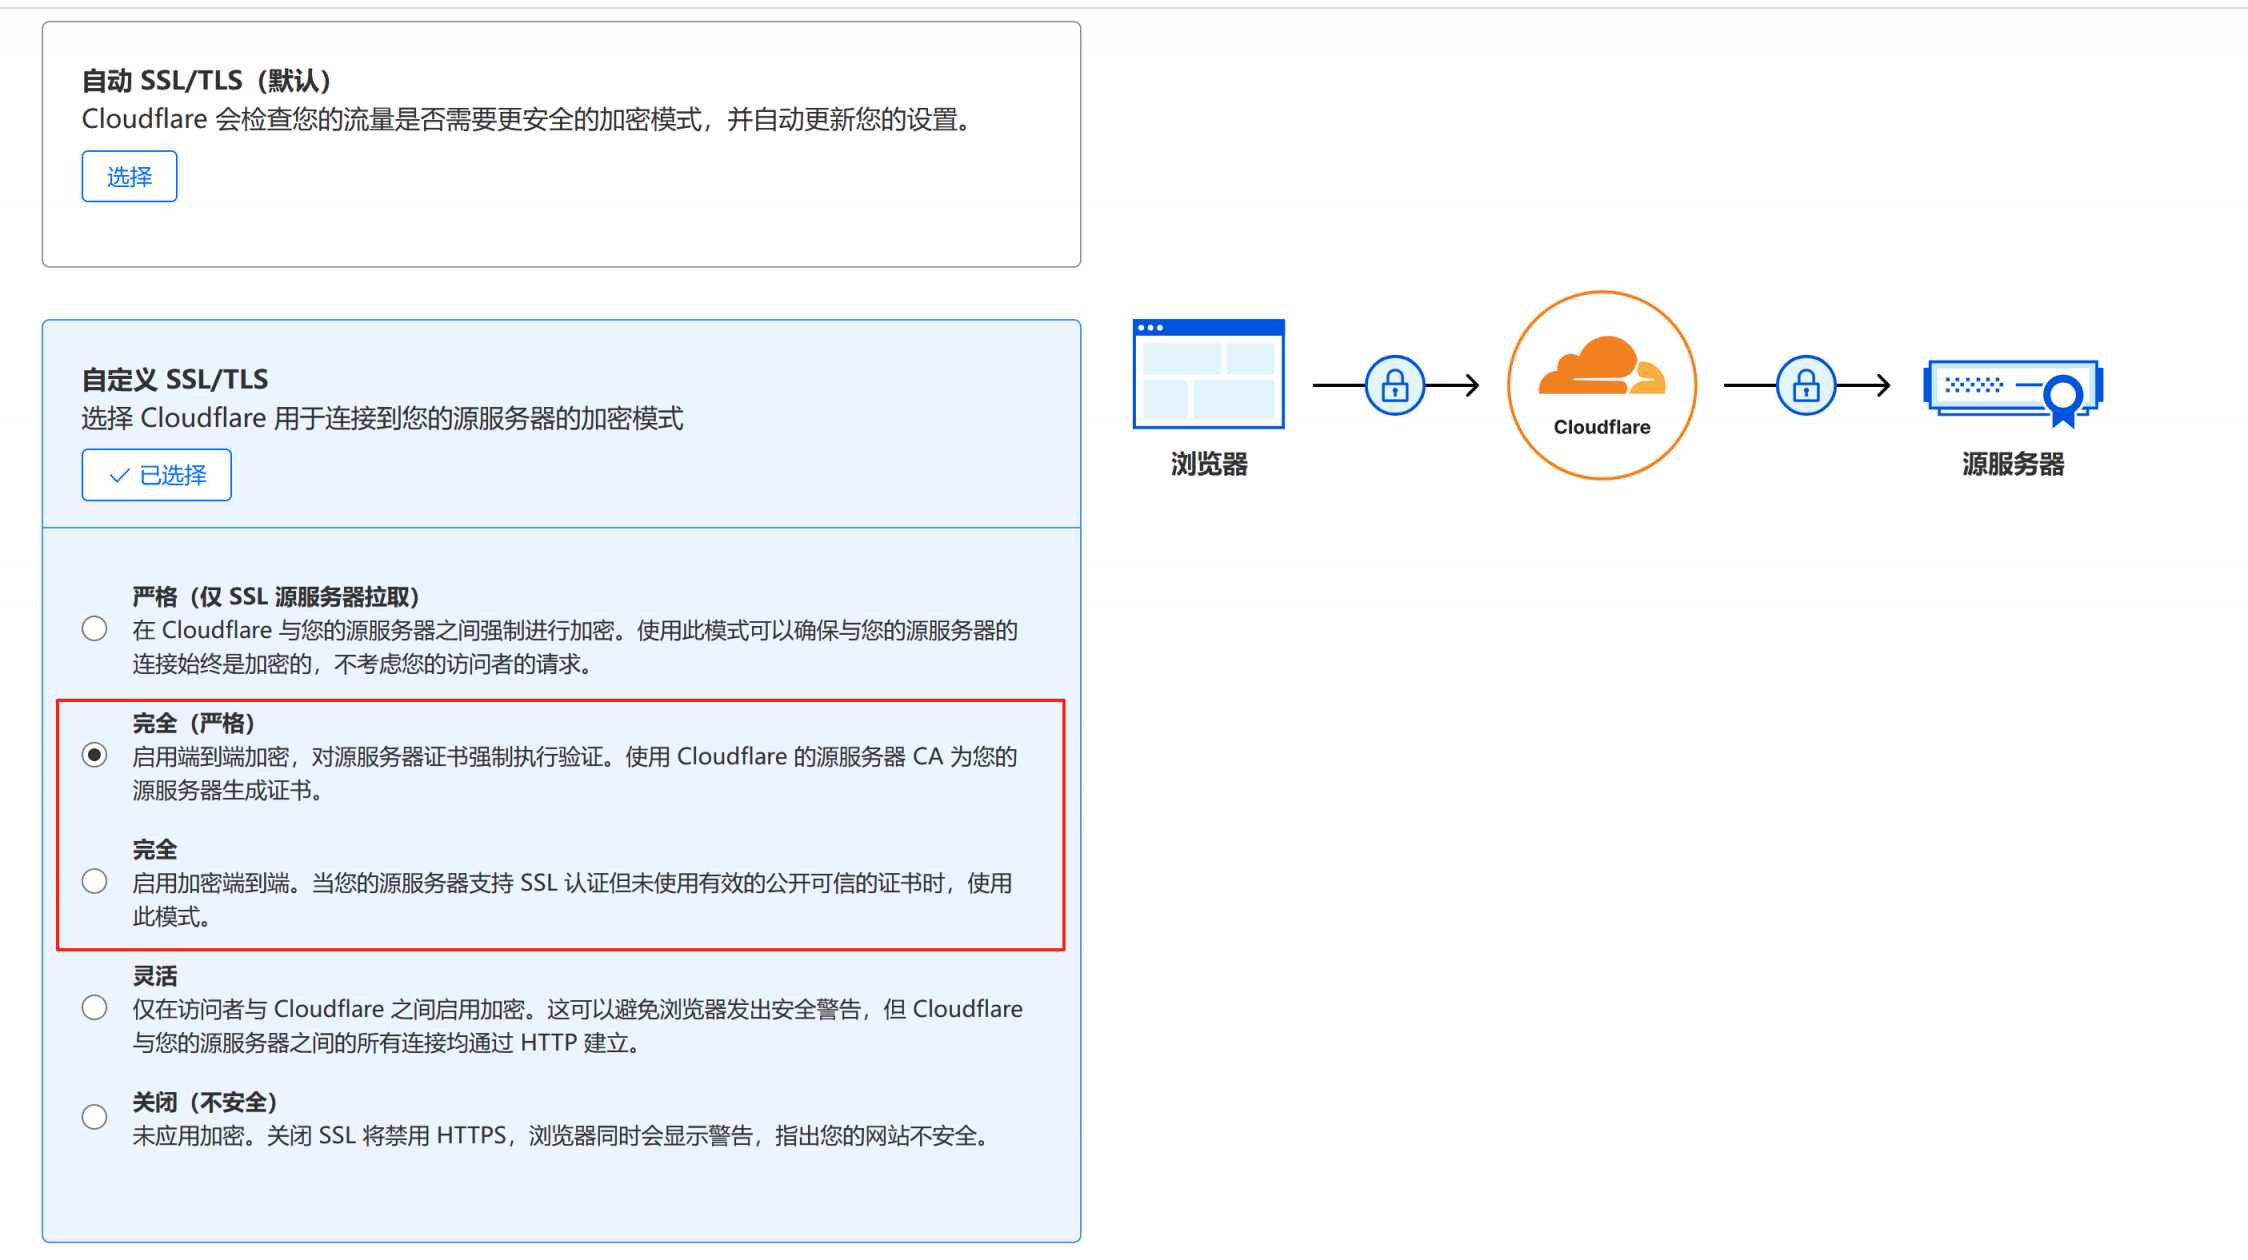
首先前往你托管在CF的域名配置界面,选择左侧SSL/TLS-概述 ,选择SSL/TLS加密-配置 。
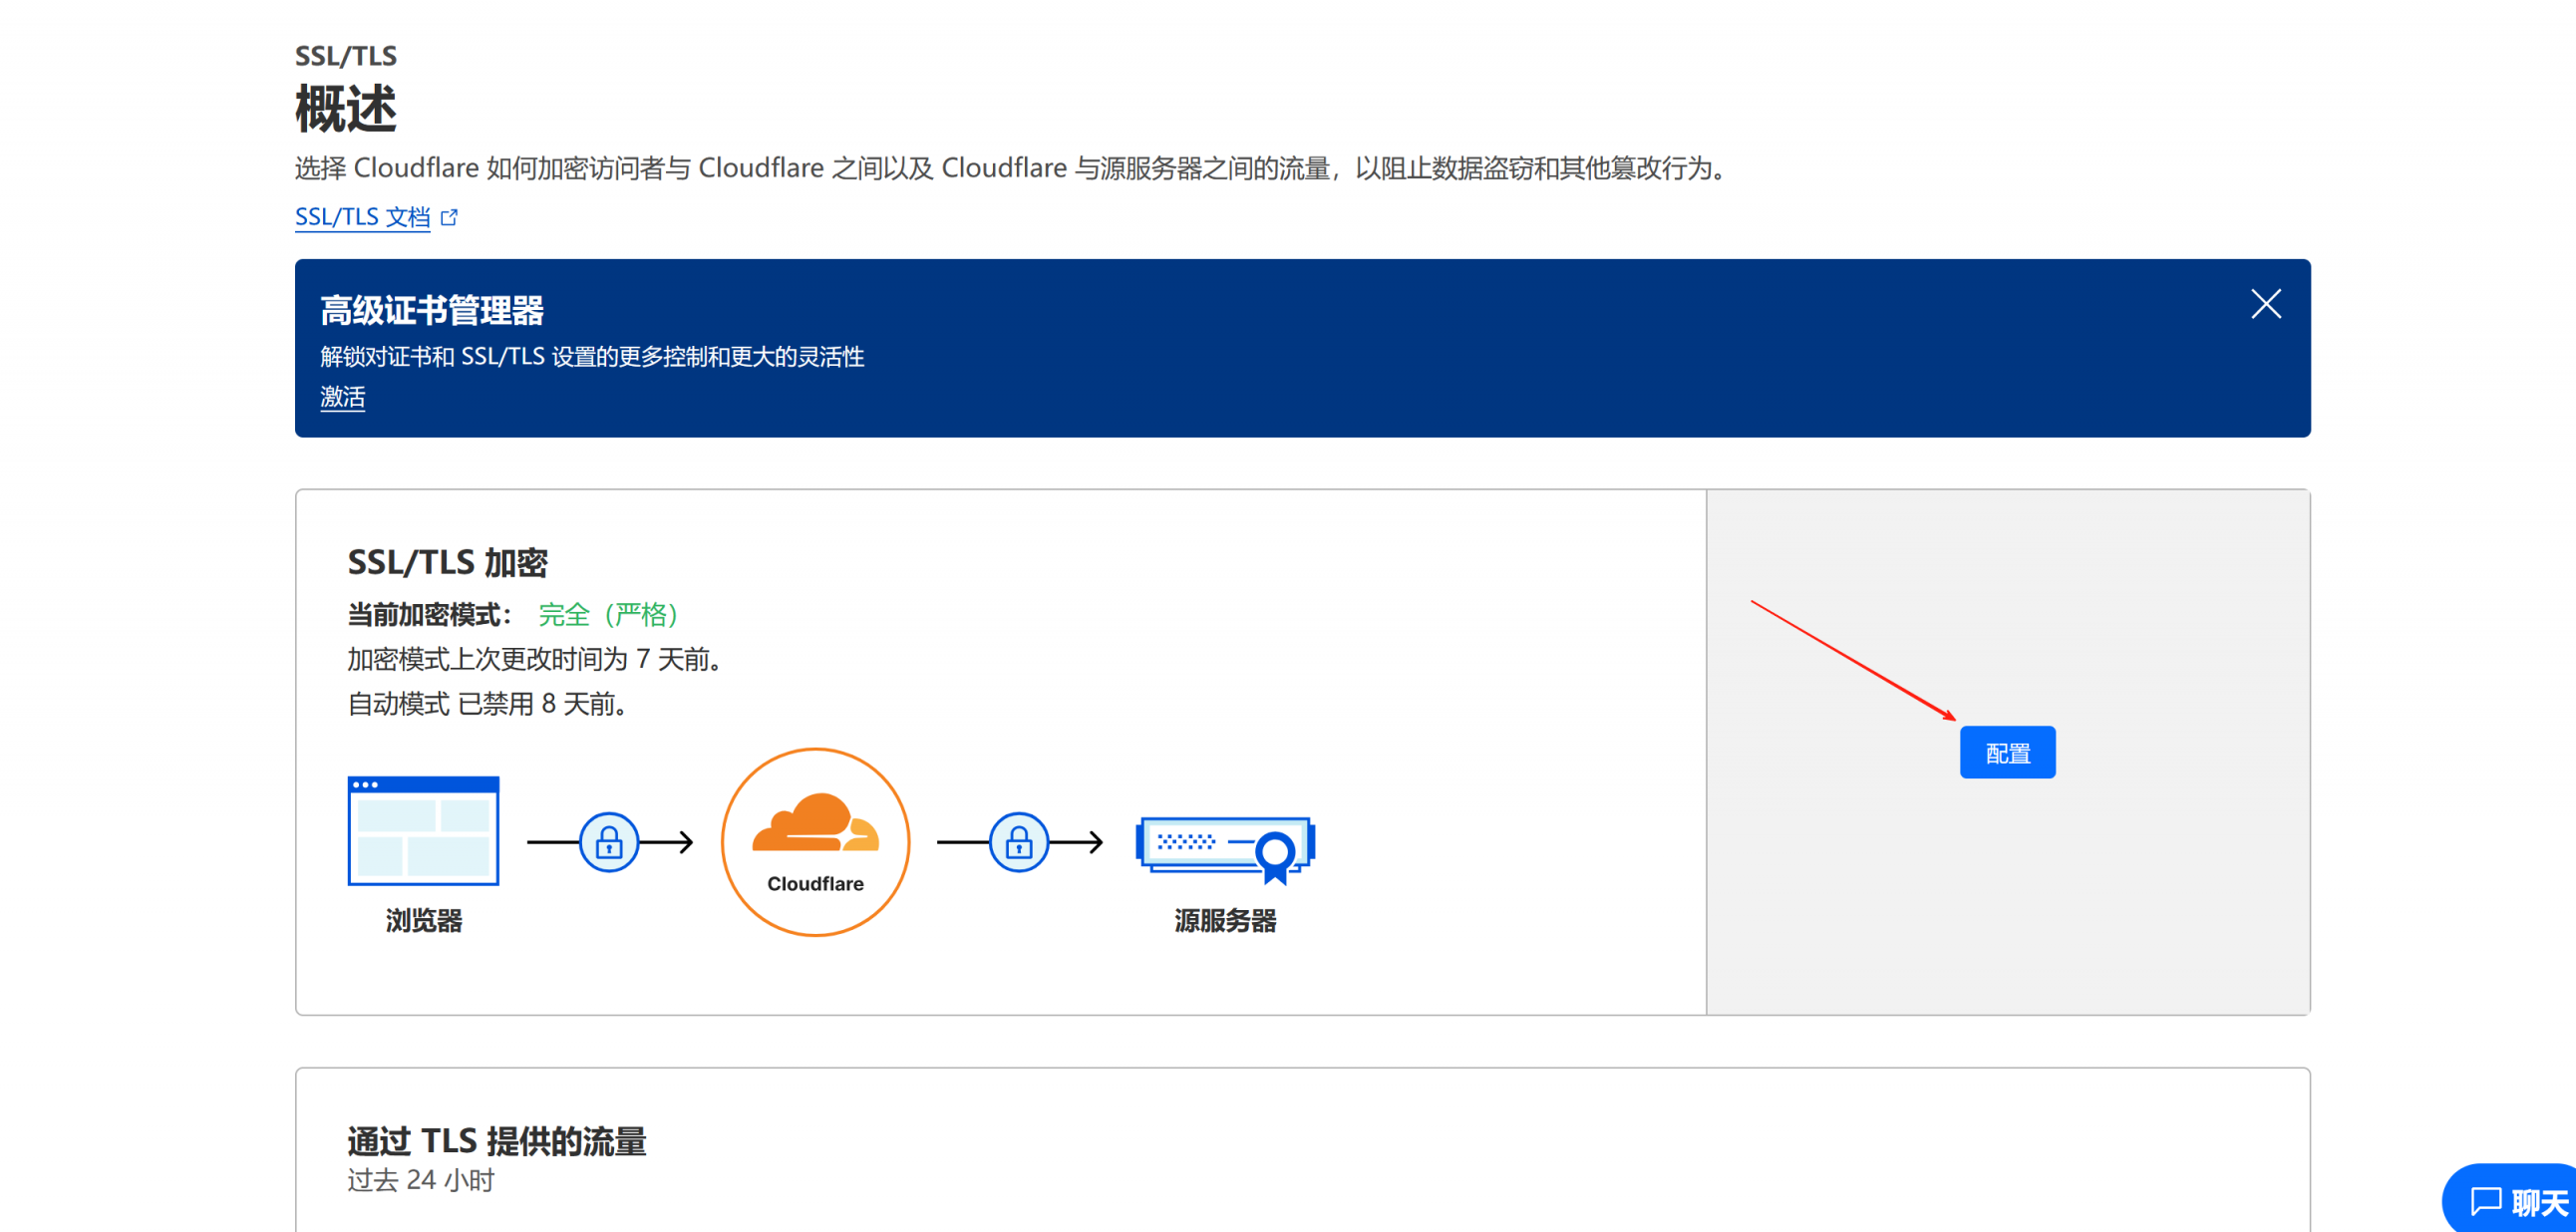
在默认的情况下,该选项应该是灵活模式,即CF CDN到源服务器是HTTP协议,建议改为完全或者完全(严格),当你使用非CF生成的自签名证书时,可以选择完全;如果你使用CF官方签名的自签名证书或者是由可信的CA签发的证书,建议选择完全(严格),如果搞不清楚有什么区别,选择完全就行。不可使用灵活,使用灵活的情况下,在CDN后面部署的如果是HTTPS站点,则会导致多次重定向无法访问。
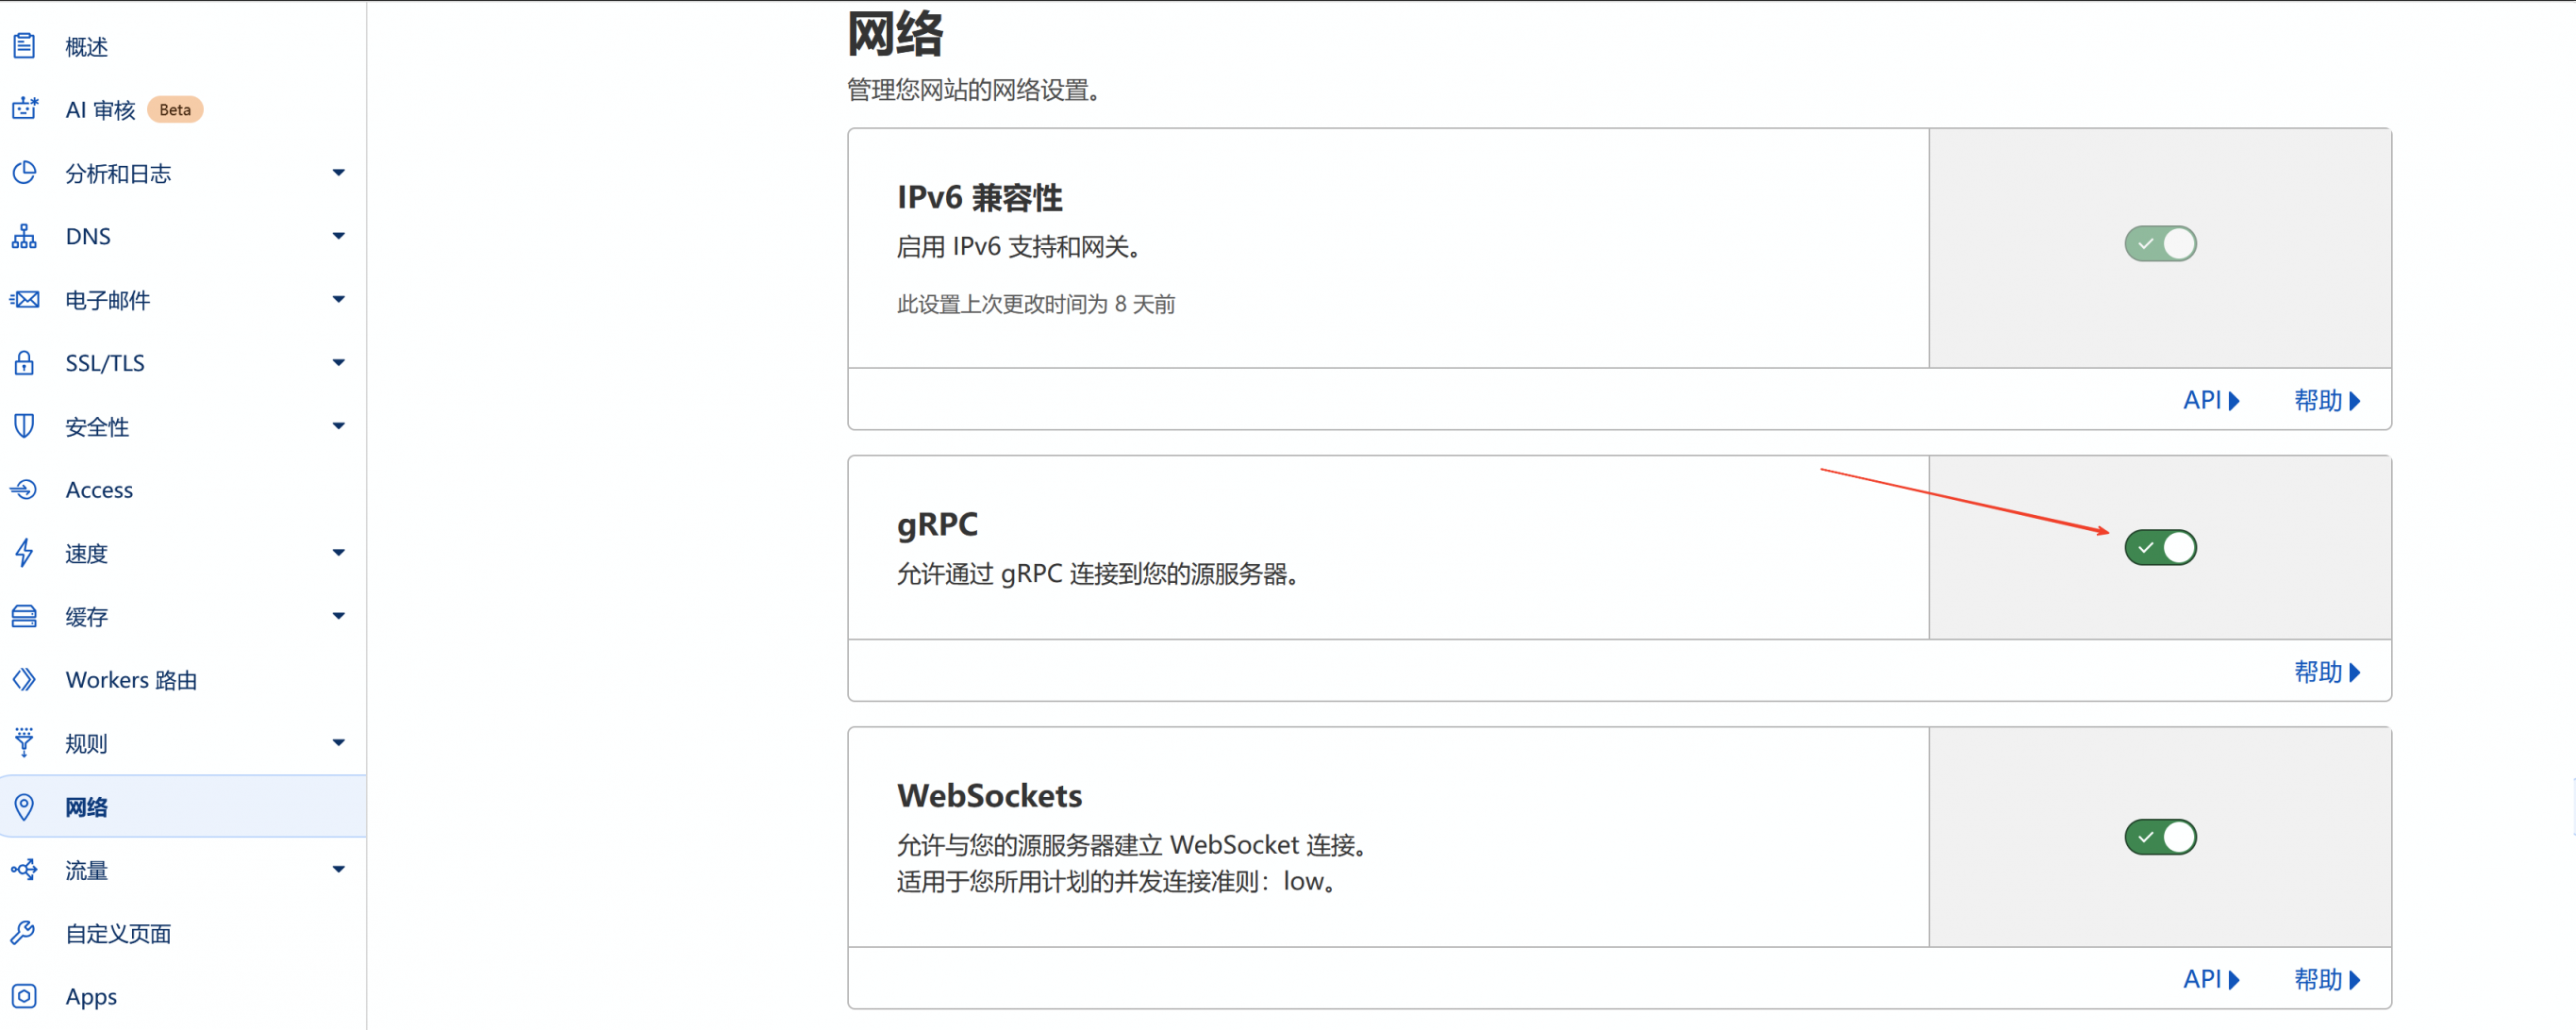
同样是域名配置界面,在网络中开启允许gRPC通过,该选项默认是关闭的。
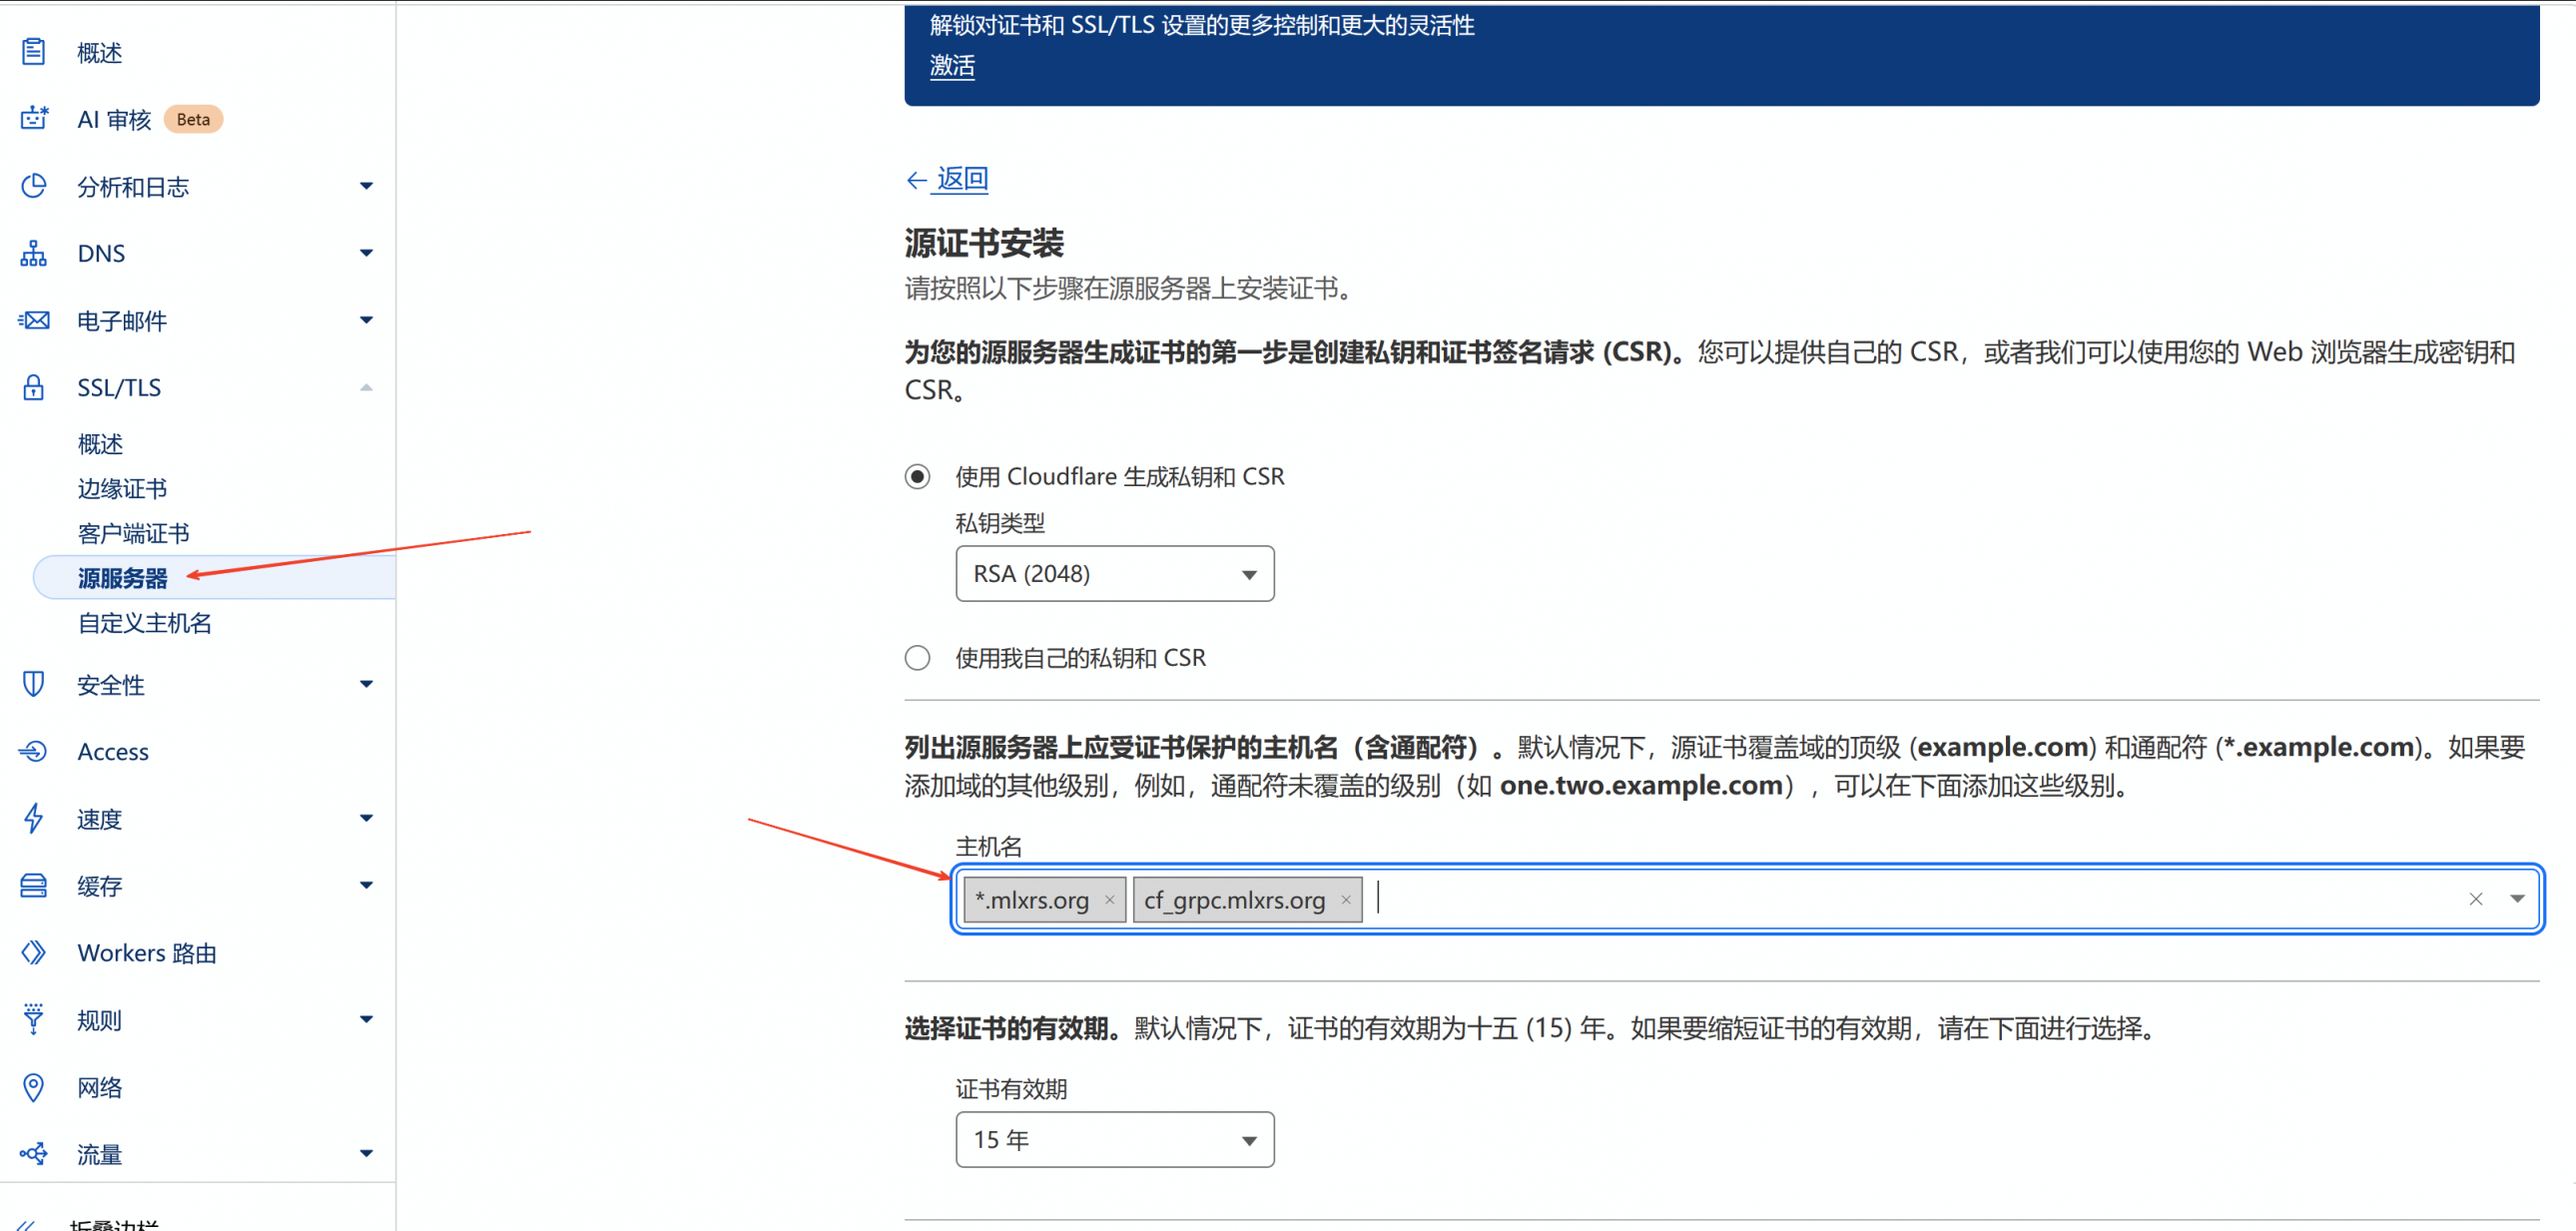
同样是域名配置界面,创建源服务器证书.
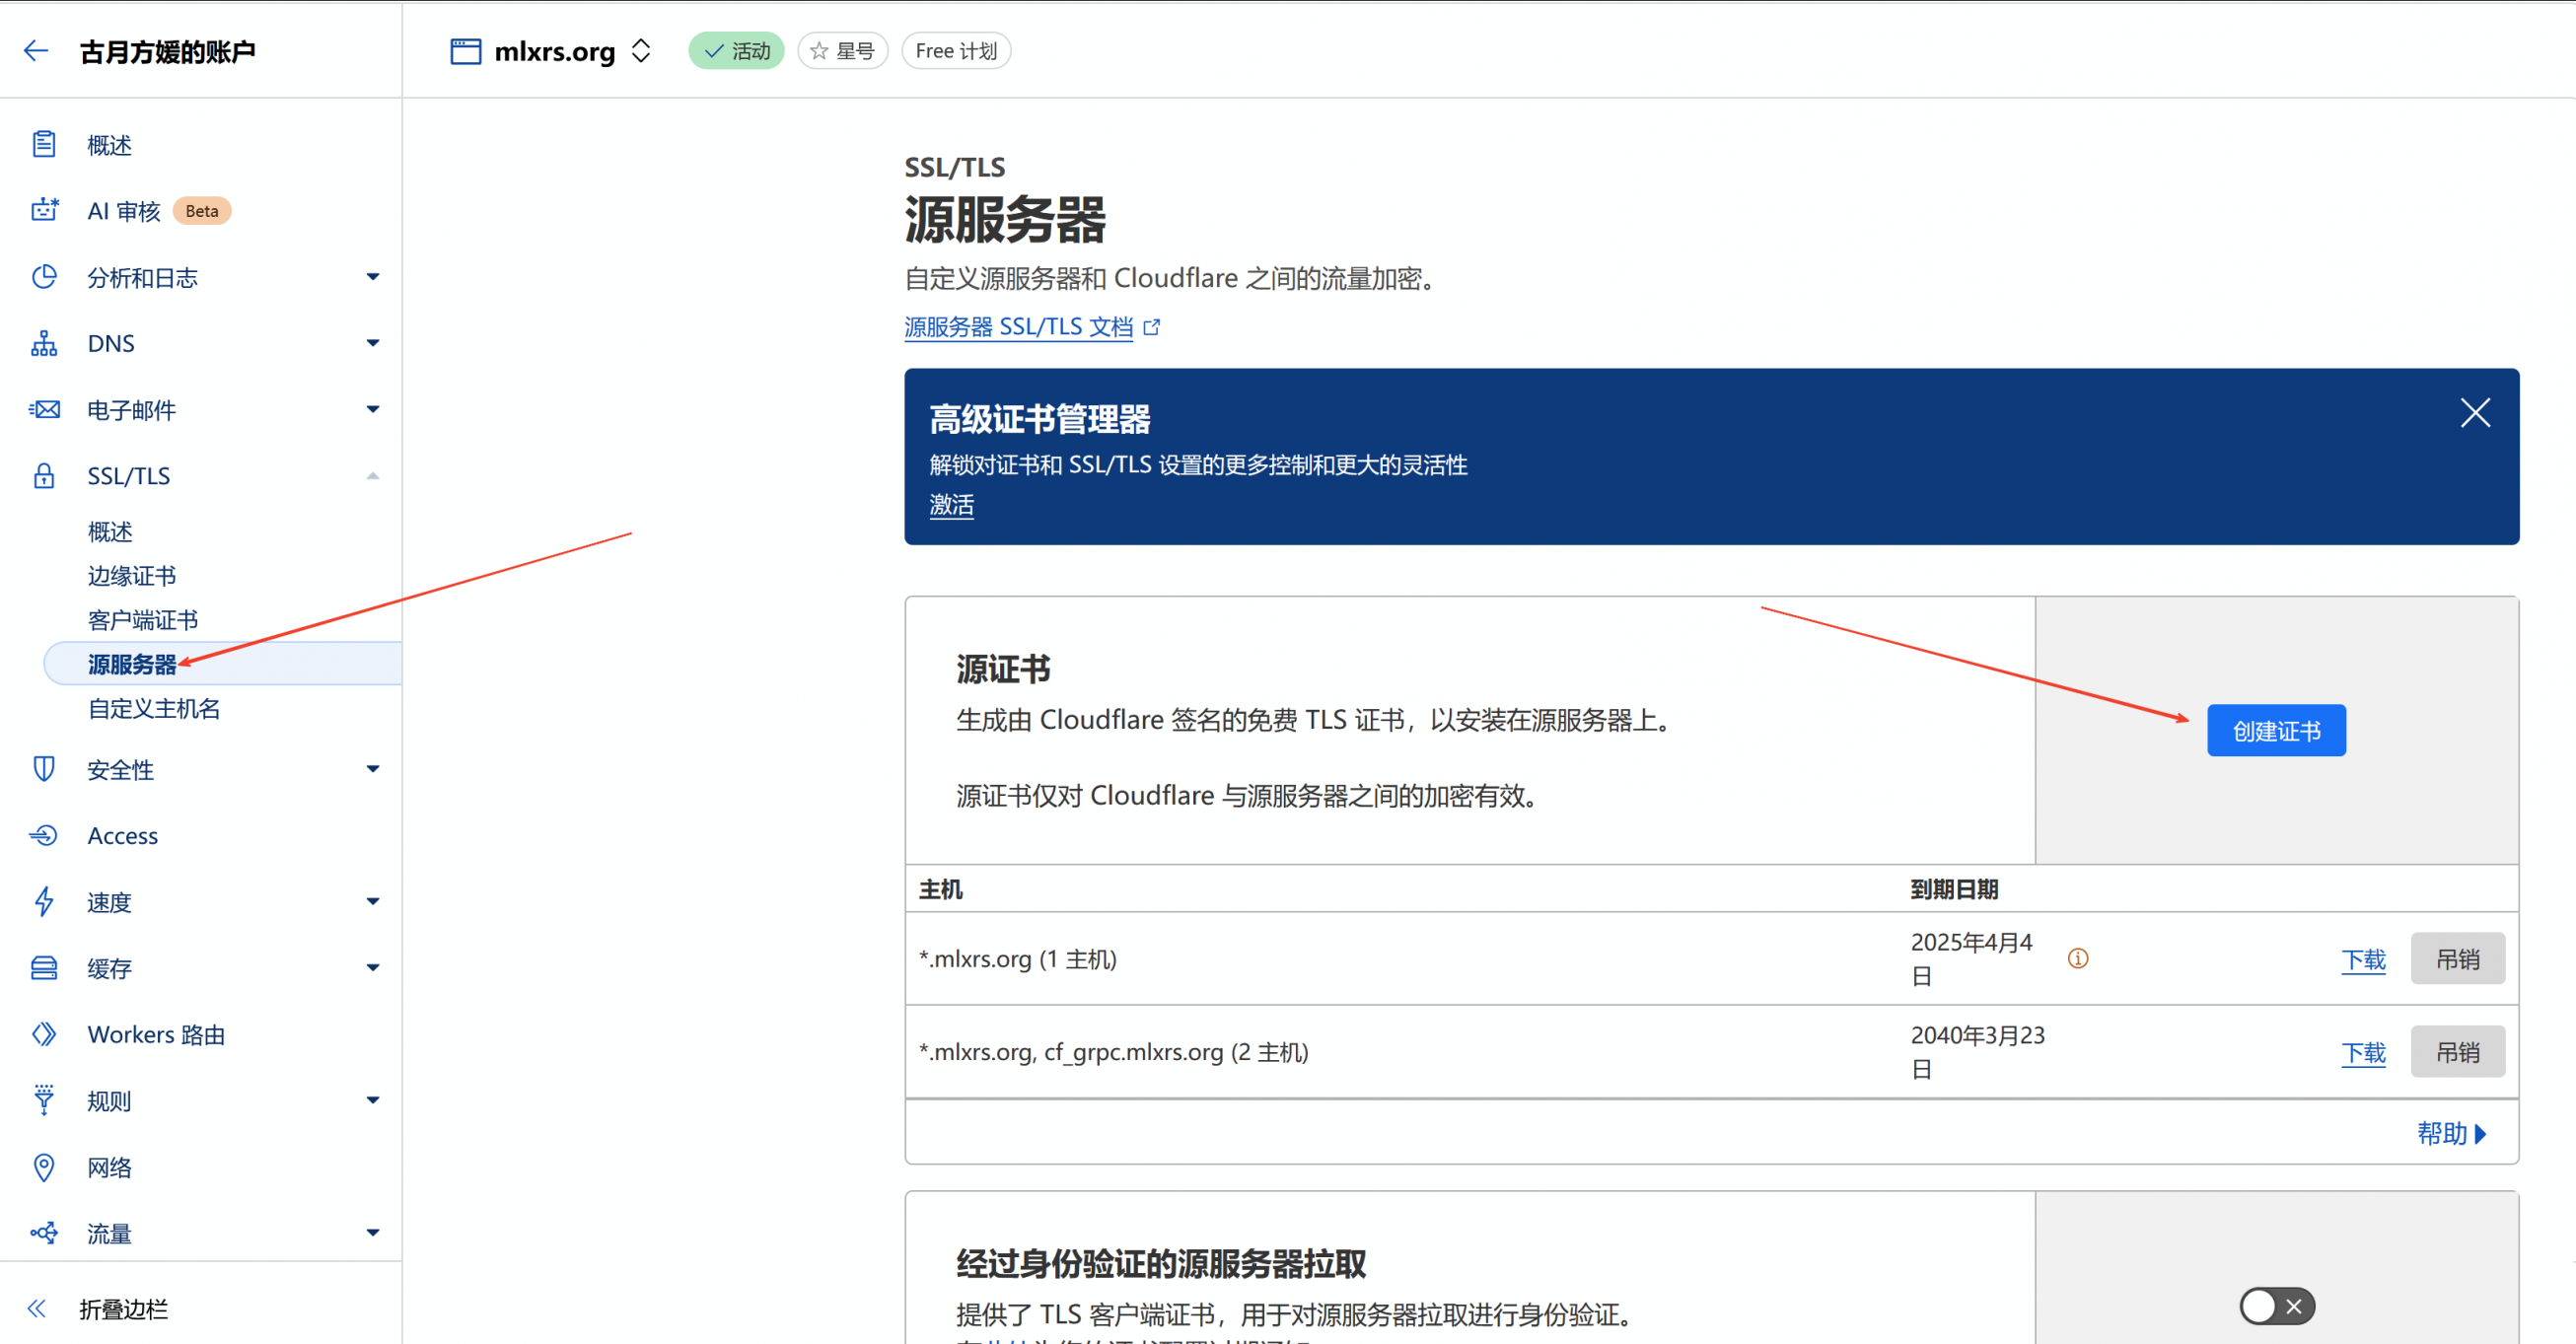
填入的域名理论上只需要通配符即可,但是你也可以添加上你的grpc用域名。
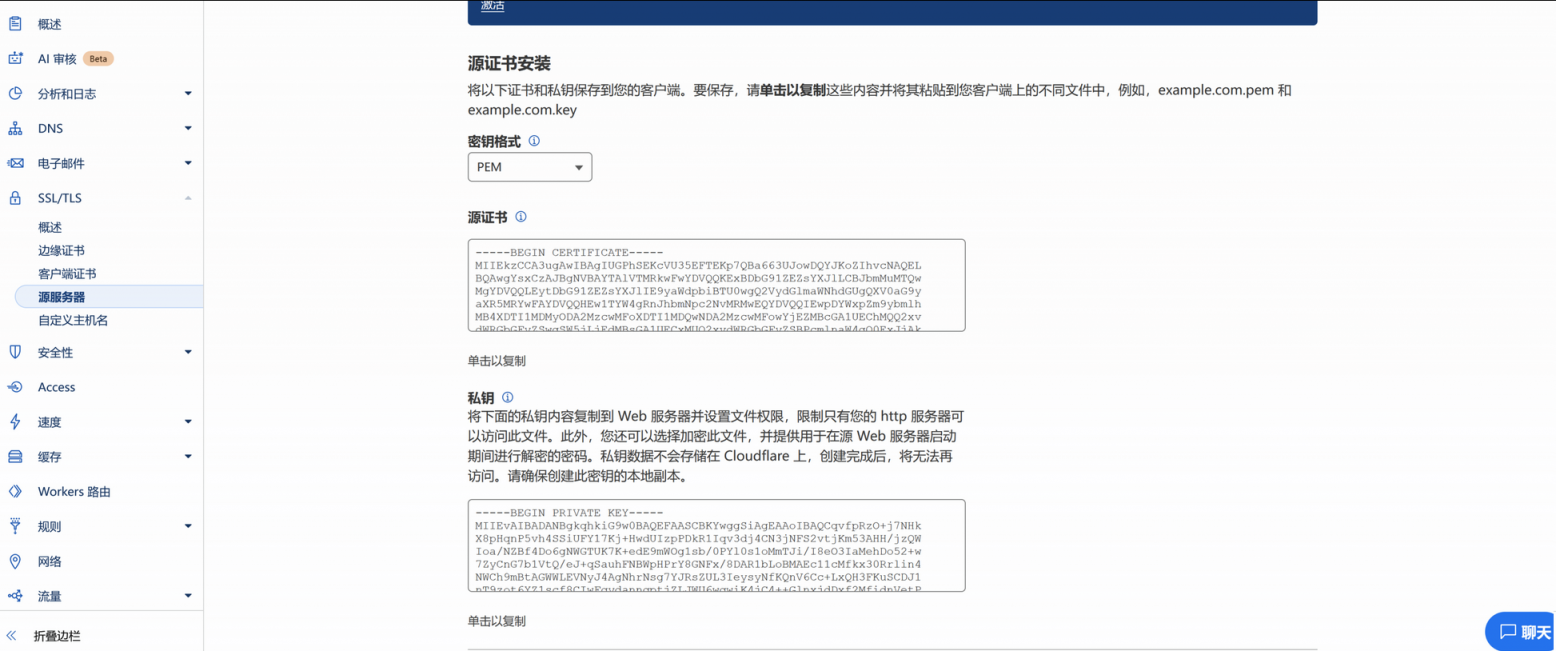
点击创建后会显示如下的界面,此时需要在ServerStatus工作目录下面创建一个tls目录,如果工作目录是默认的,就使用mkdir -p /opt/ServerStatus/tls创建即可。随后将源证书内容和私钥分别保存在/opt/ServerStatus/tls/server.pem和/opt/ServerStatus/tls/server.key中以供ServerStatus调用,内容使用nano编辑器创建文件后粘贴就行。
CloudFlare Tunnel创建与安装
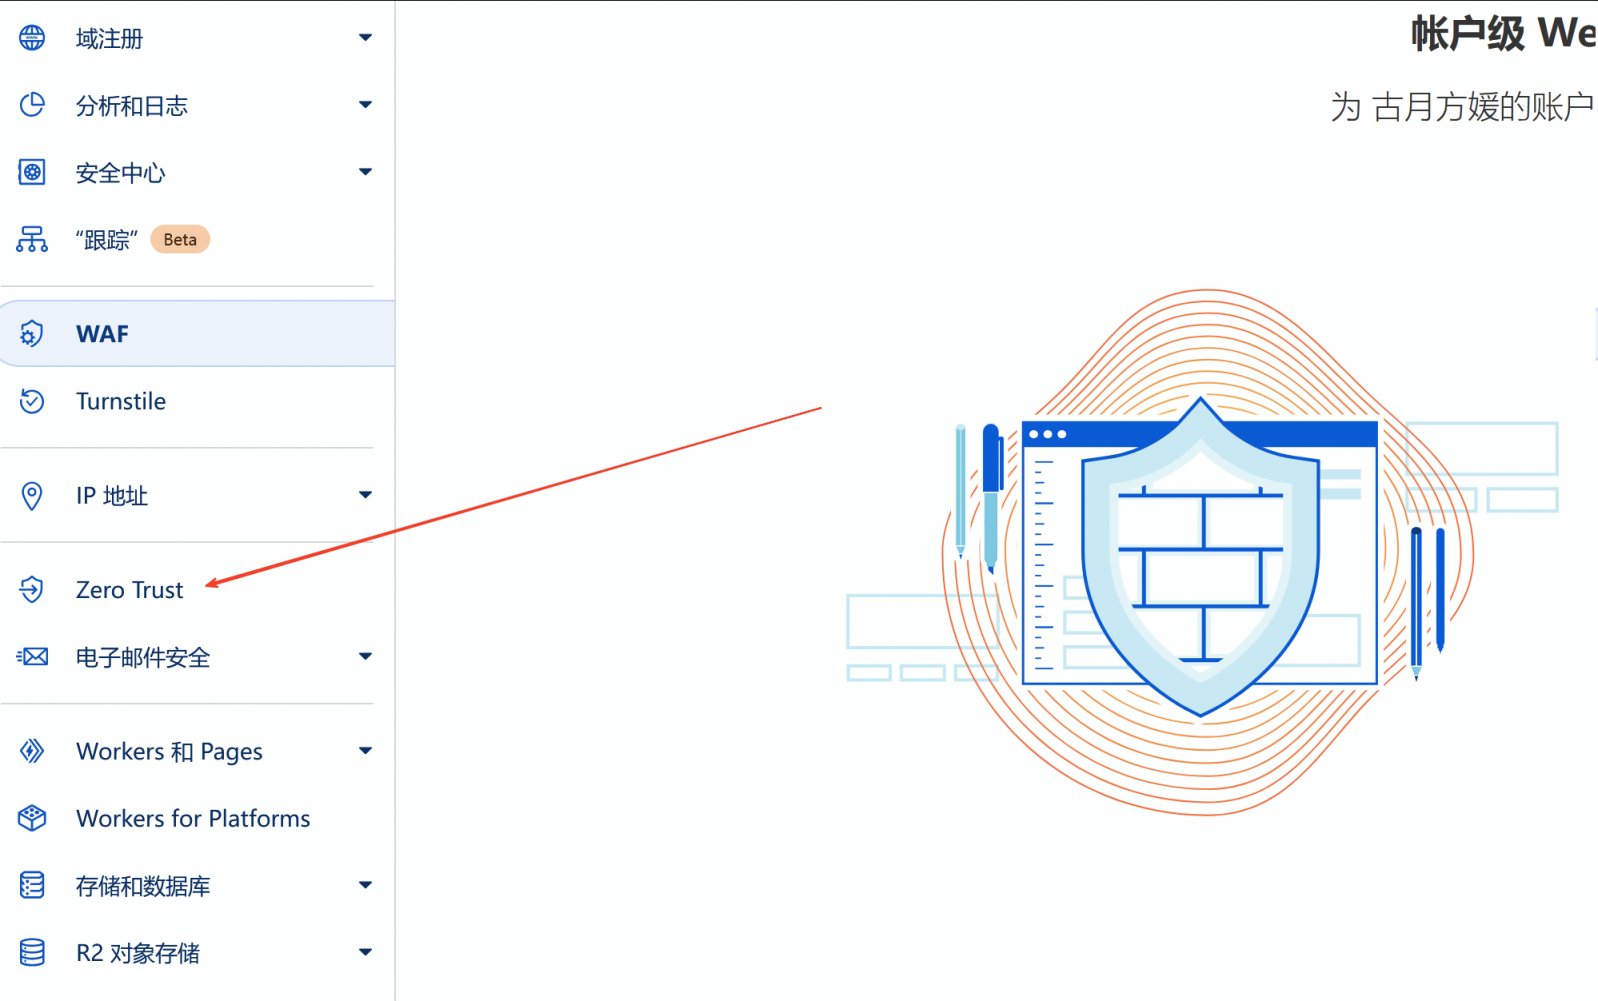
退出域名配置界面,进入账户配置界面,点击左侧边栏的Zero Trust。
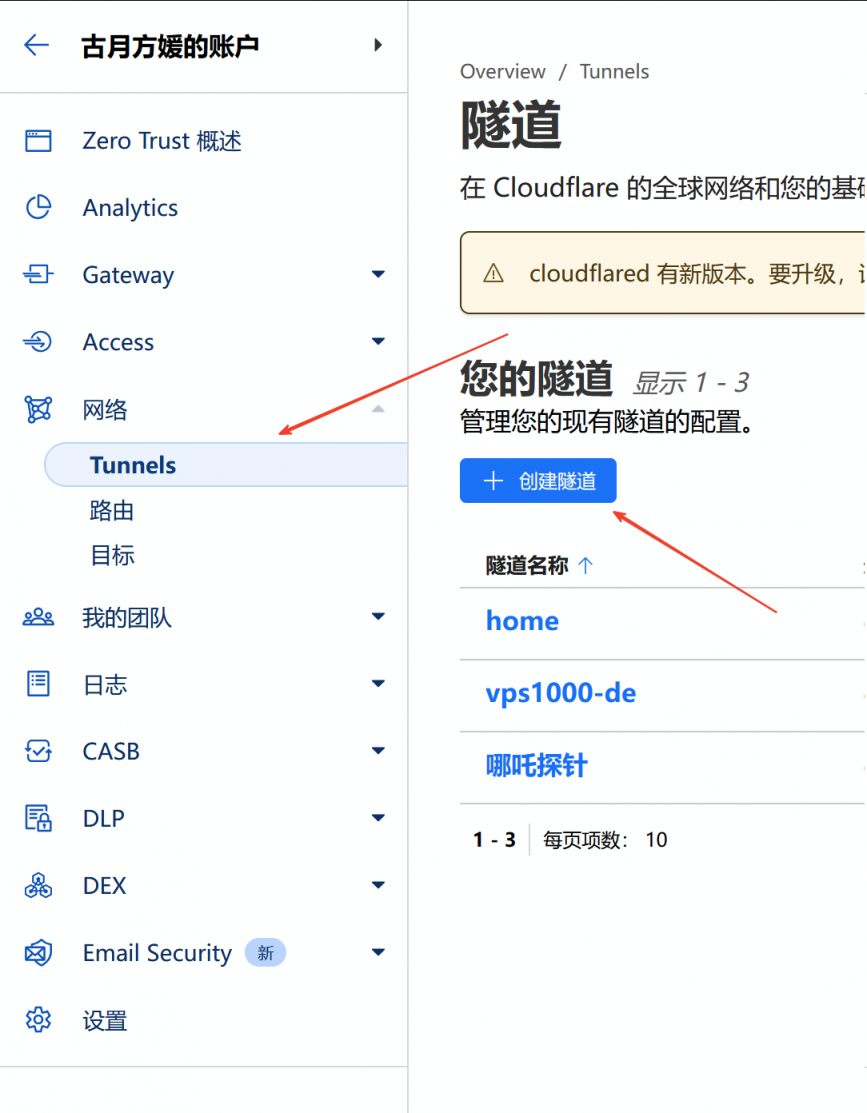
选择网络-Tunnel-创建隧道 ,创建一条新的隧道。
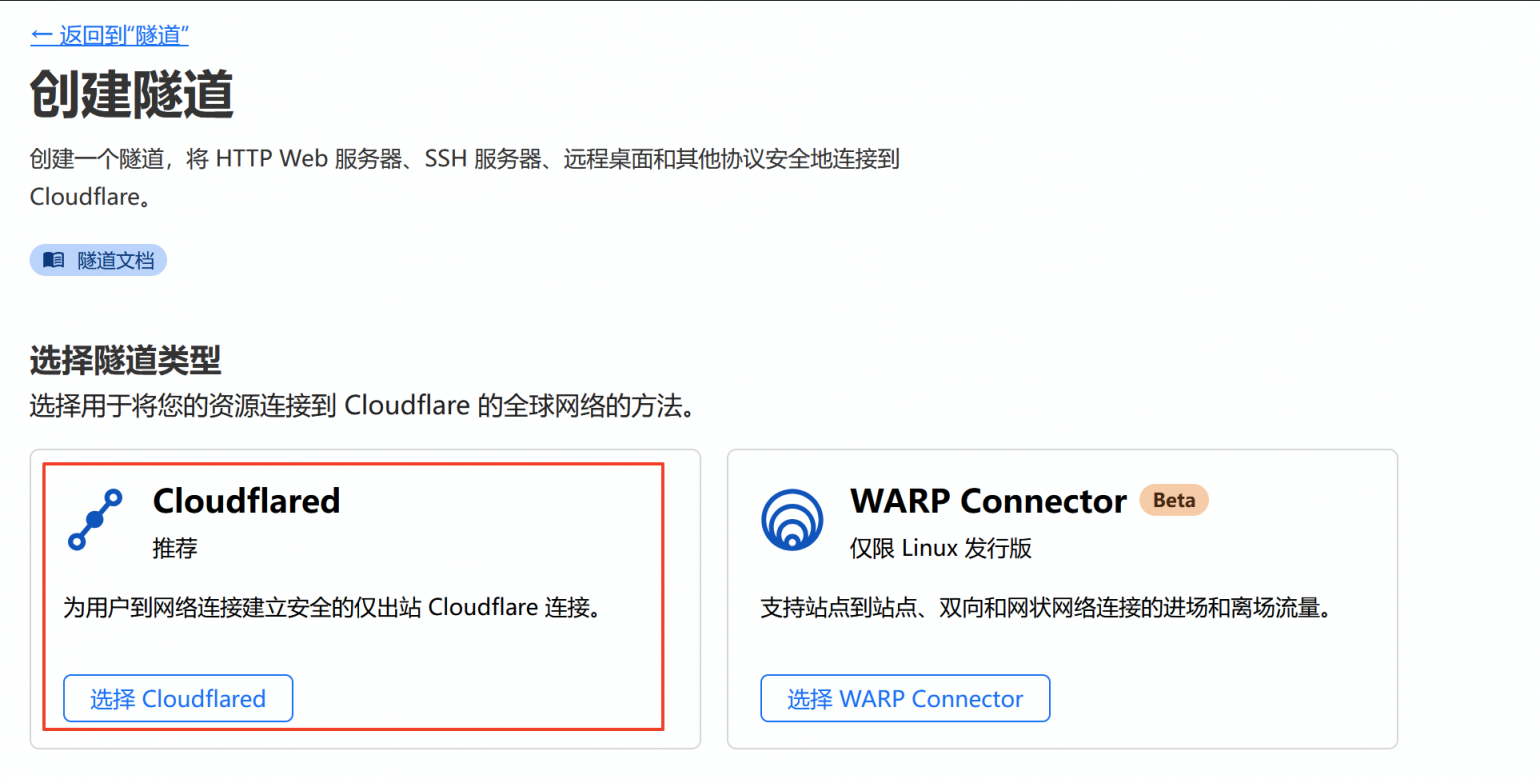
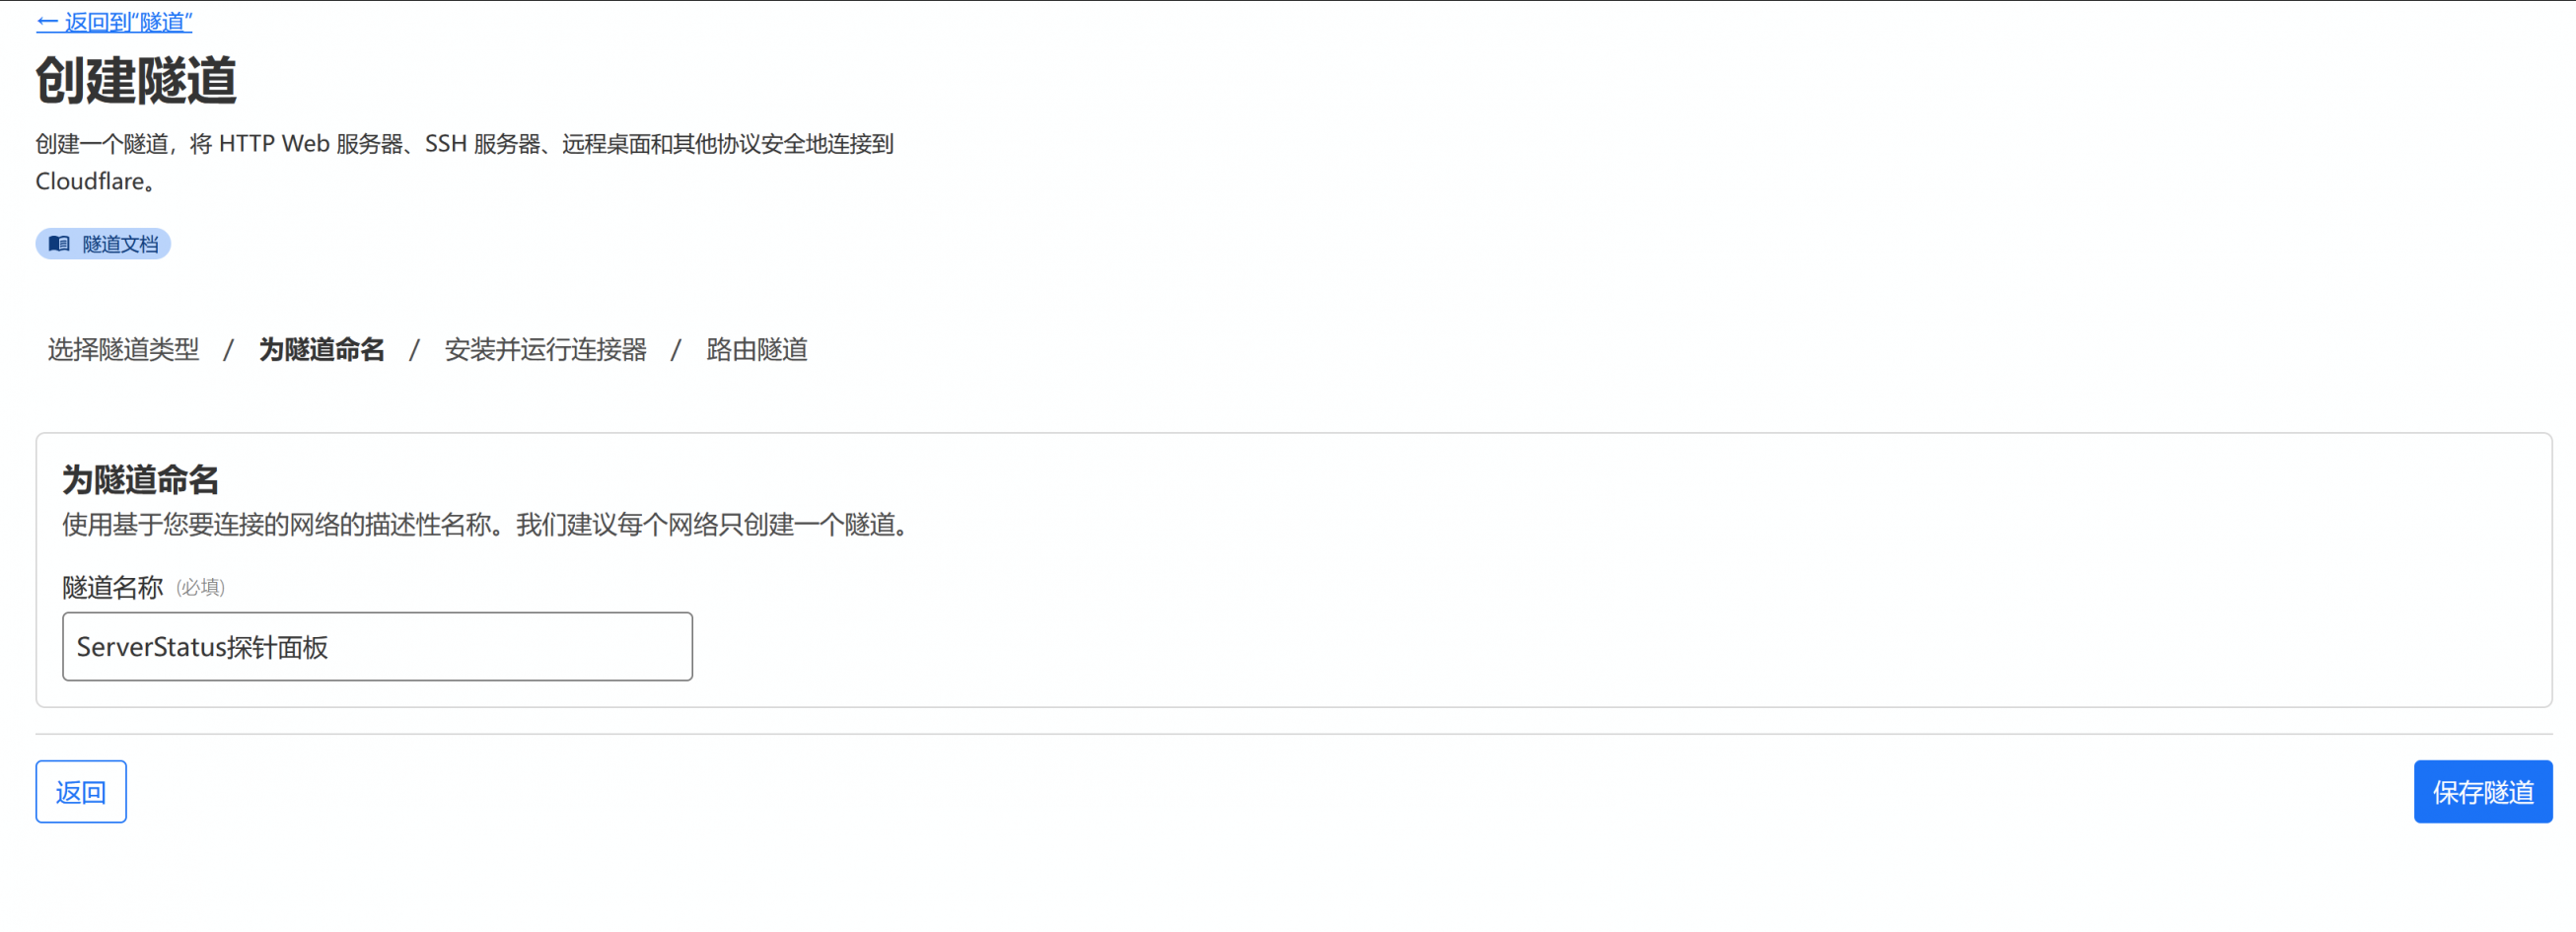
选择Cloudflared,并为隧道命名,命名可以使用中文,随后保存隧道。
根据系统架构选择安装方式,注意Debian系和RedHat系安装命令不同。

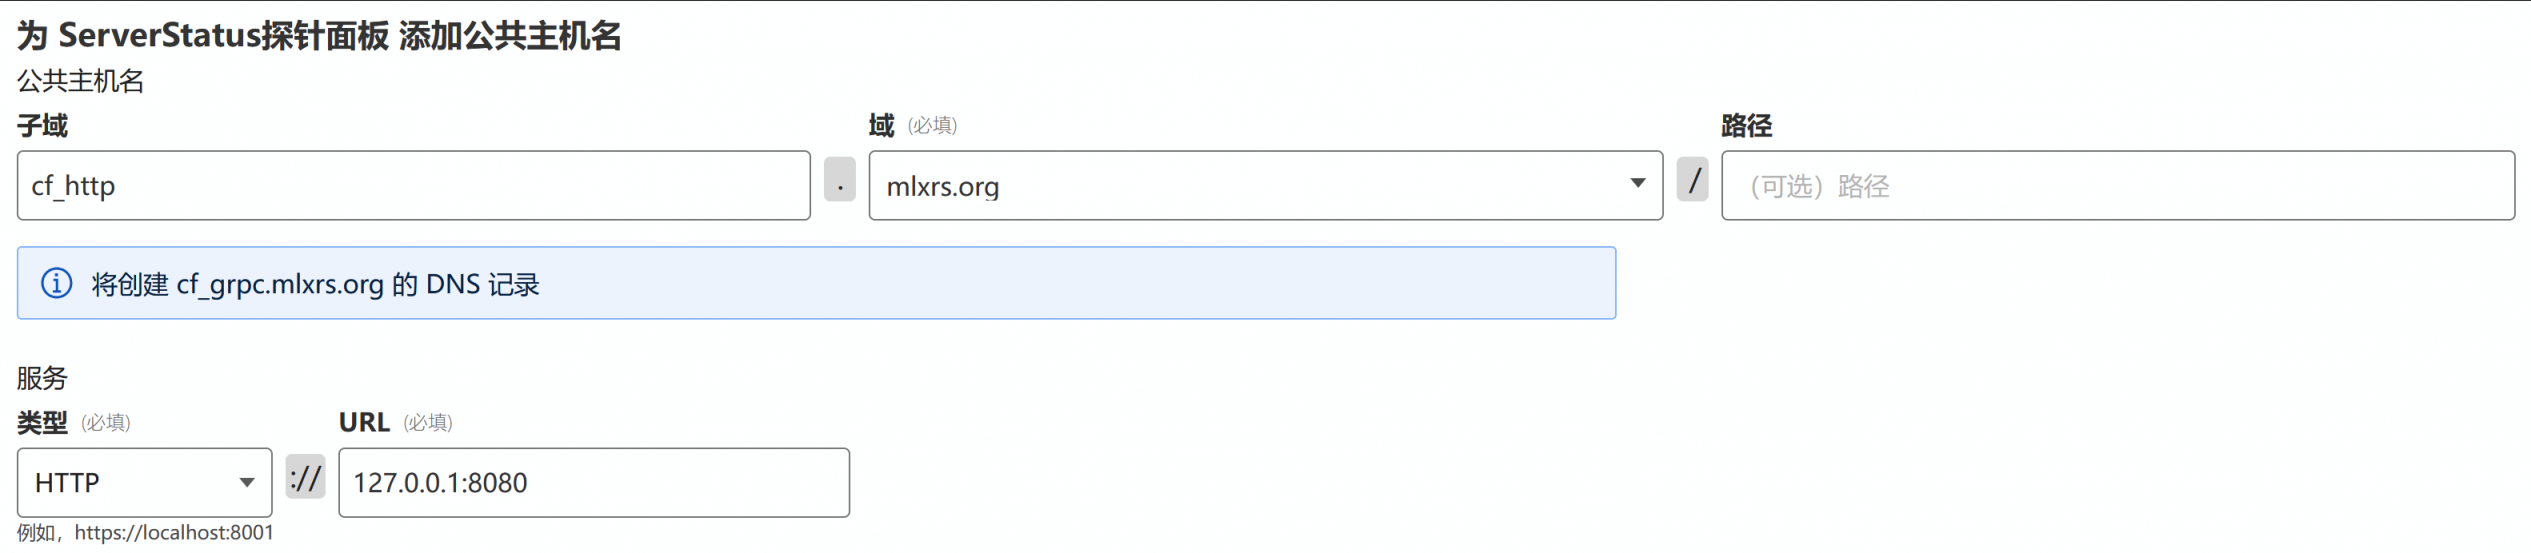
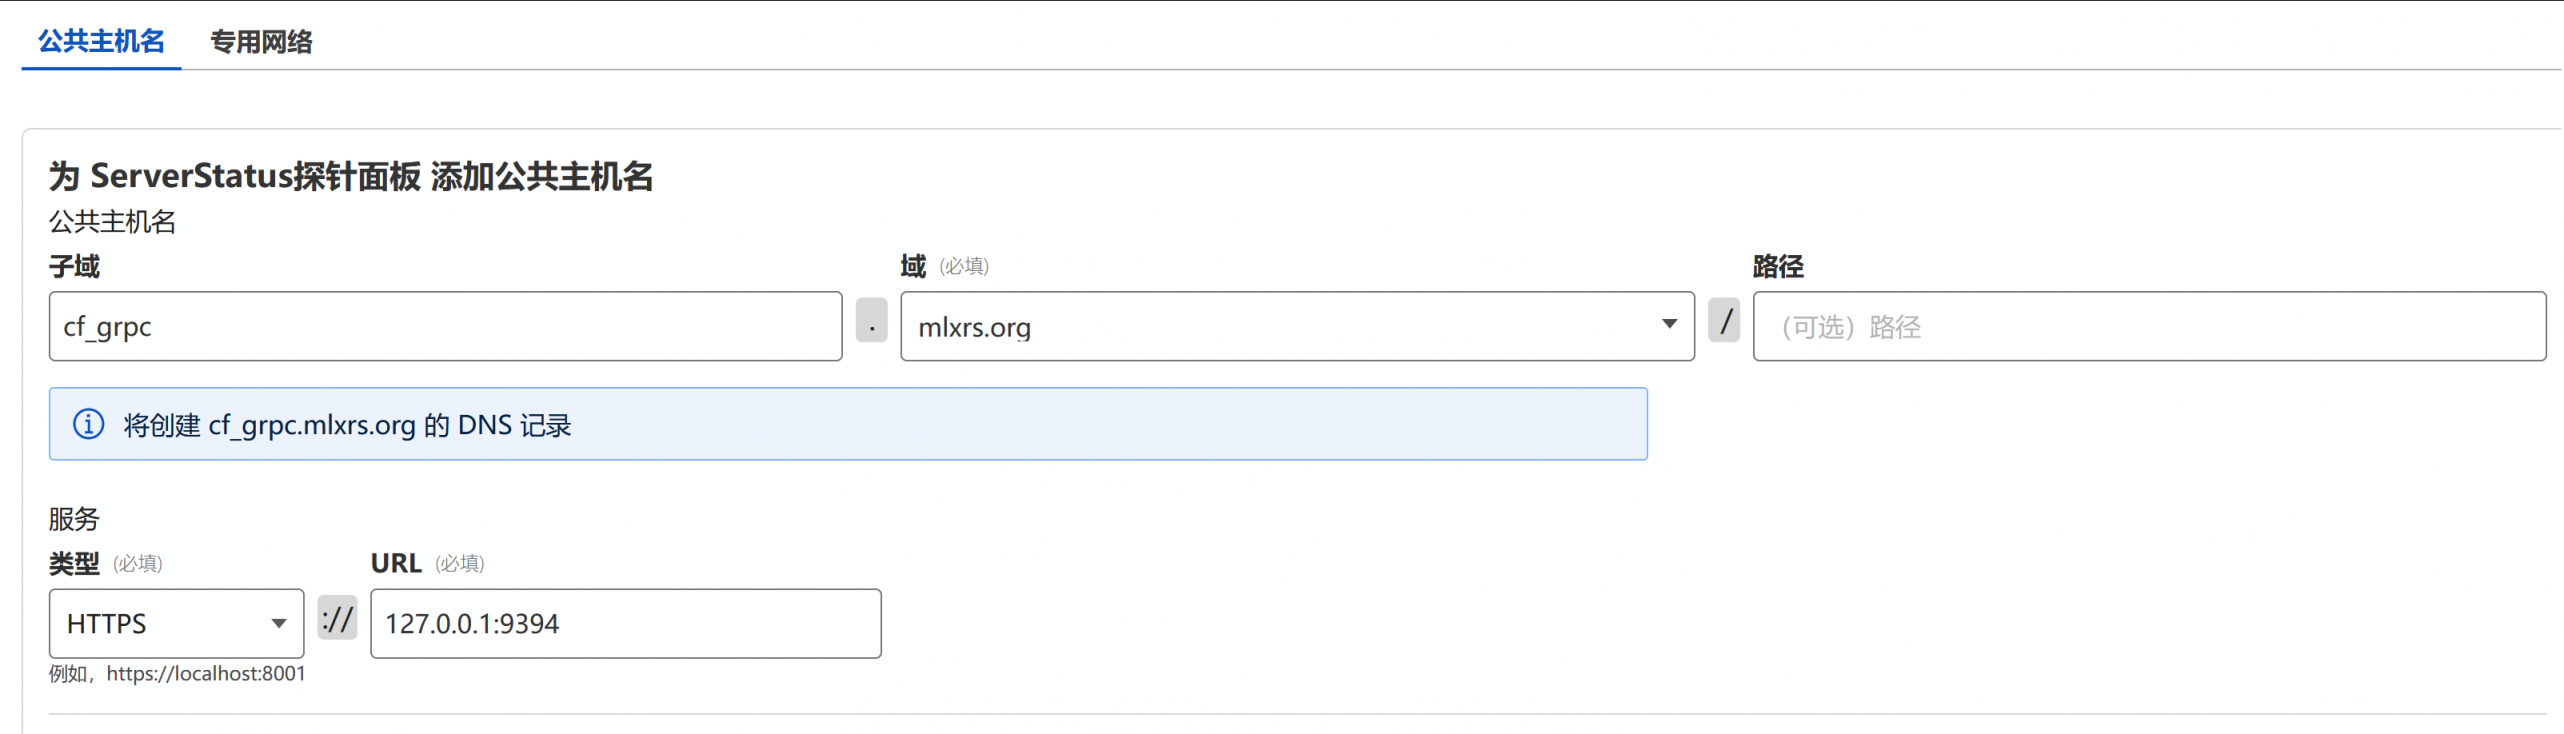
配置http和grpc转发,需要注意grpc目的需为https类型。
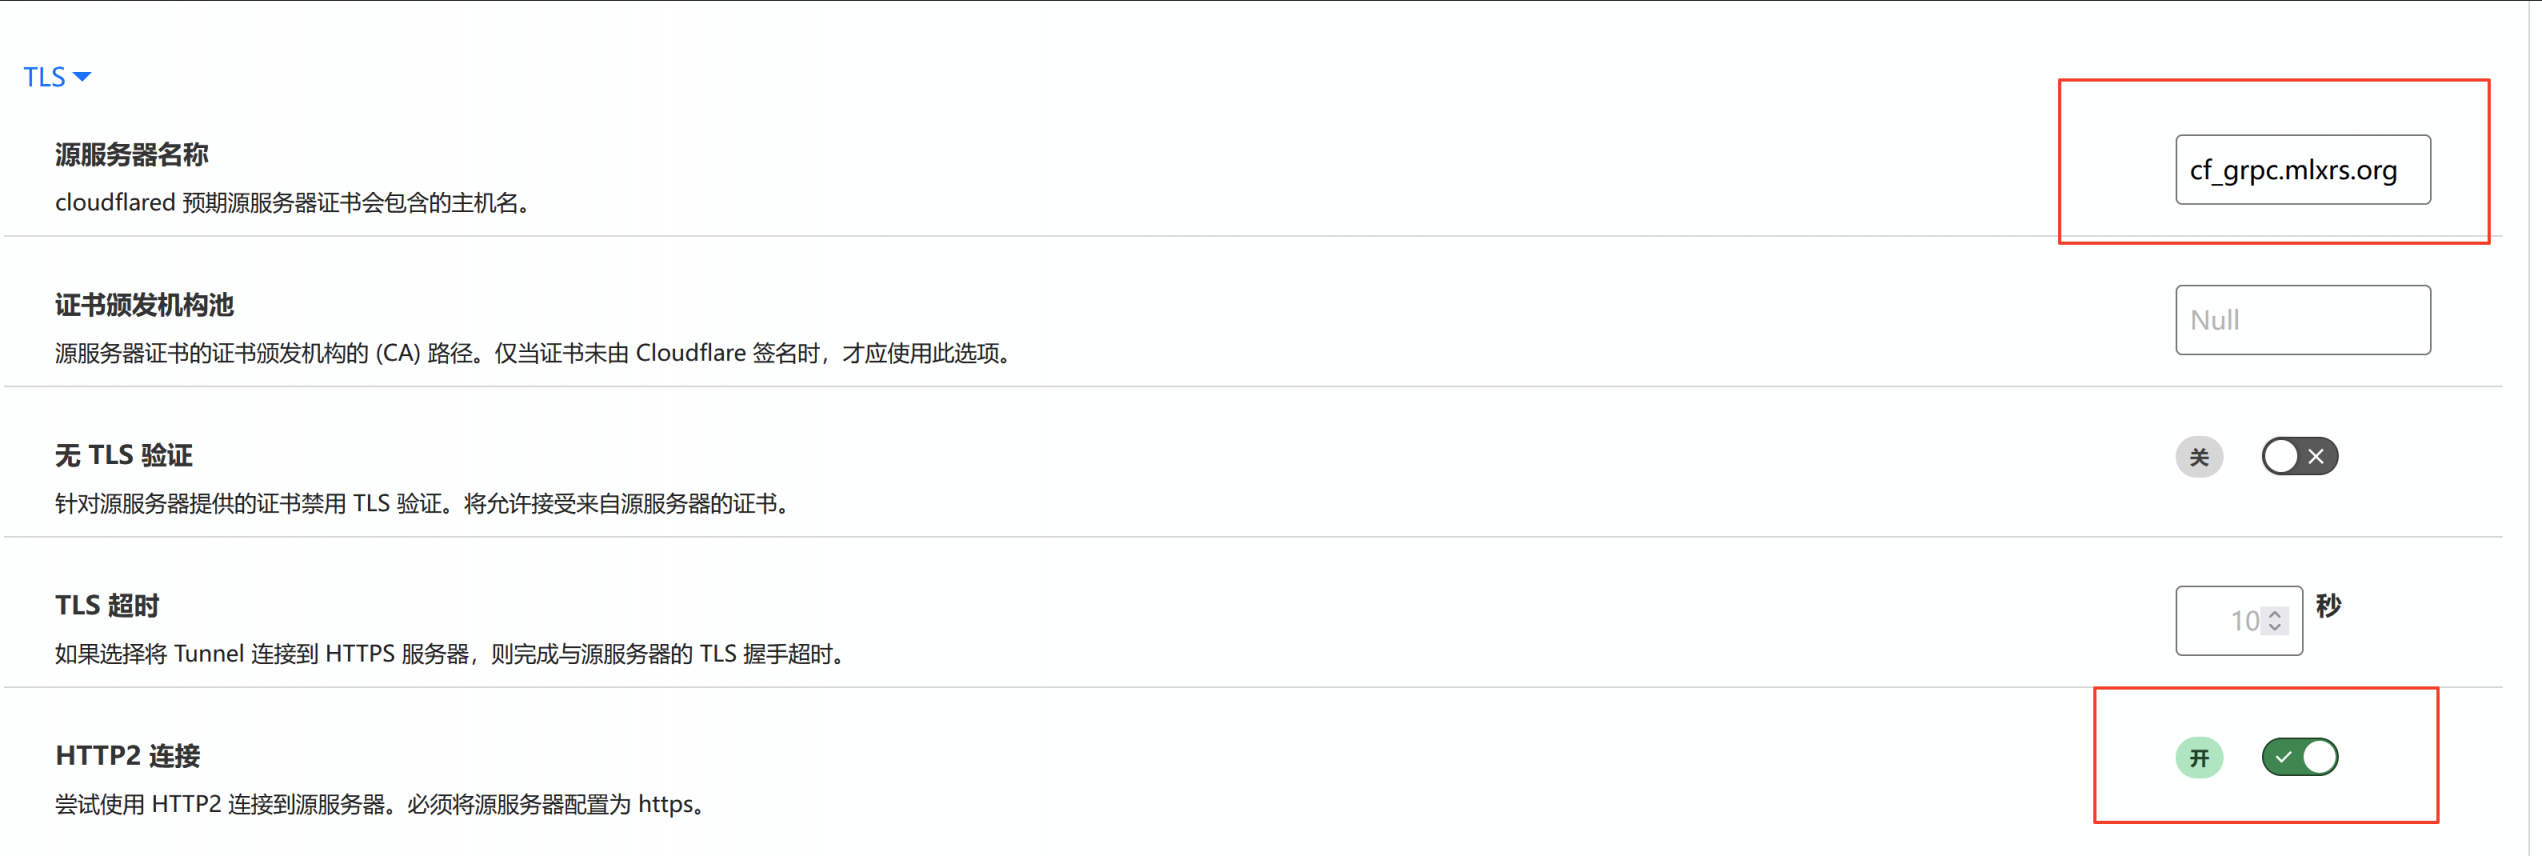
配置Tunnels的TLS开启HTTP2连接。
至此CloudFlare Tunnel安装完成,并且在DNS记录中可以看到创建了两个域名分别CNAME到了不同的cfargotunnel.com子域名上。
可选配置
为了后续上线的稳定性,建议采取以下措施
修改cloudflared配置,只允许使用http2协议
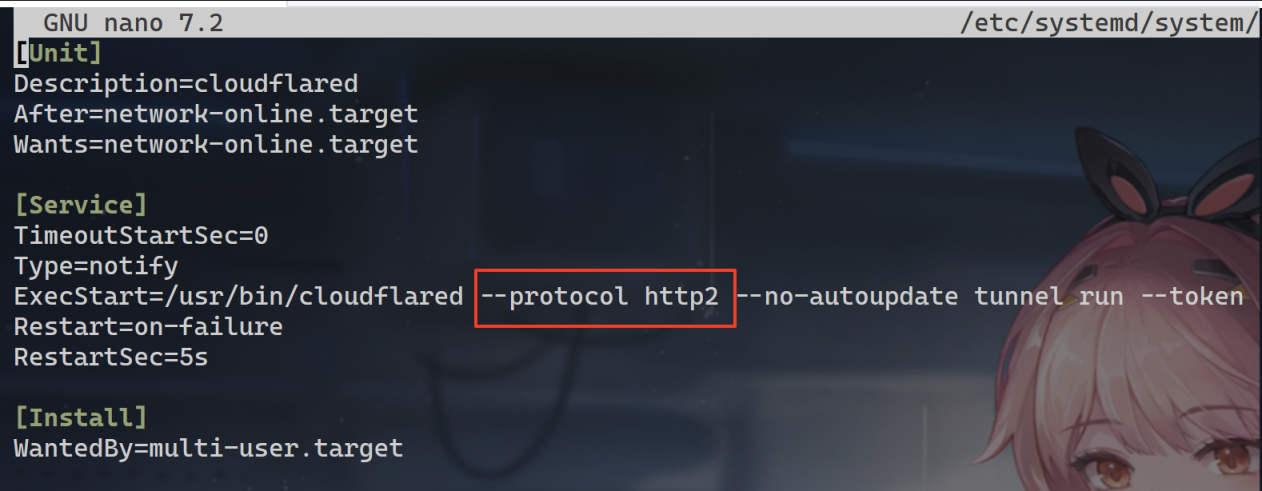
使用nano /etc/systemd/system/cloudflared.service编辑服务文件,添加--protocol http2参数,然后systemctl daemon-reload重载配置,最后systemctl restart cloudflared重启服务。
增加WAF白名单
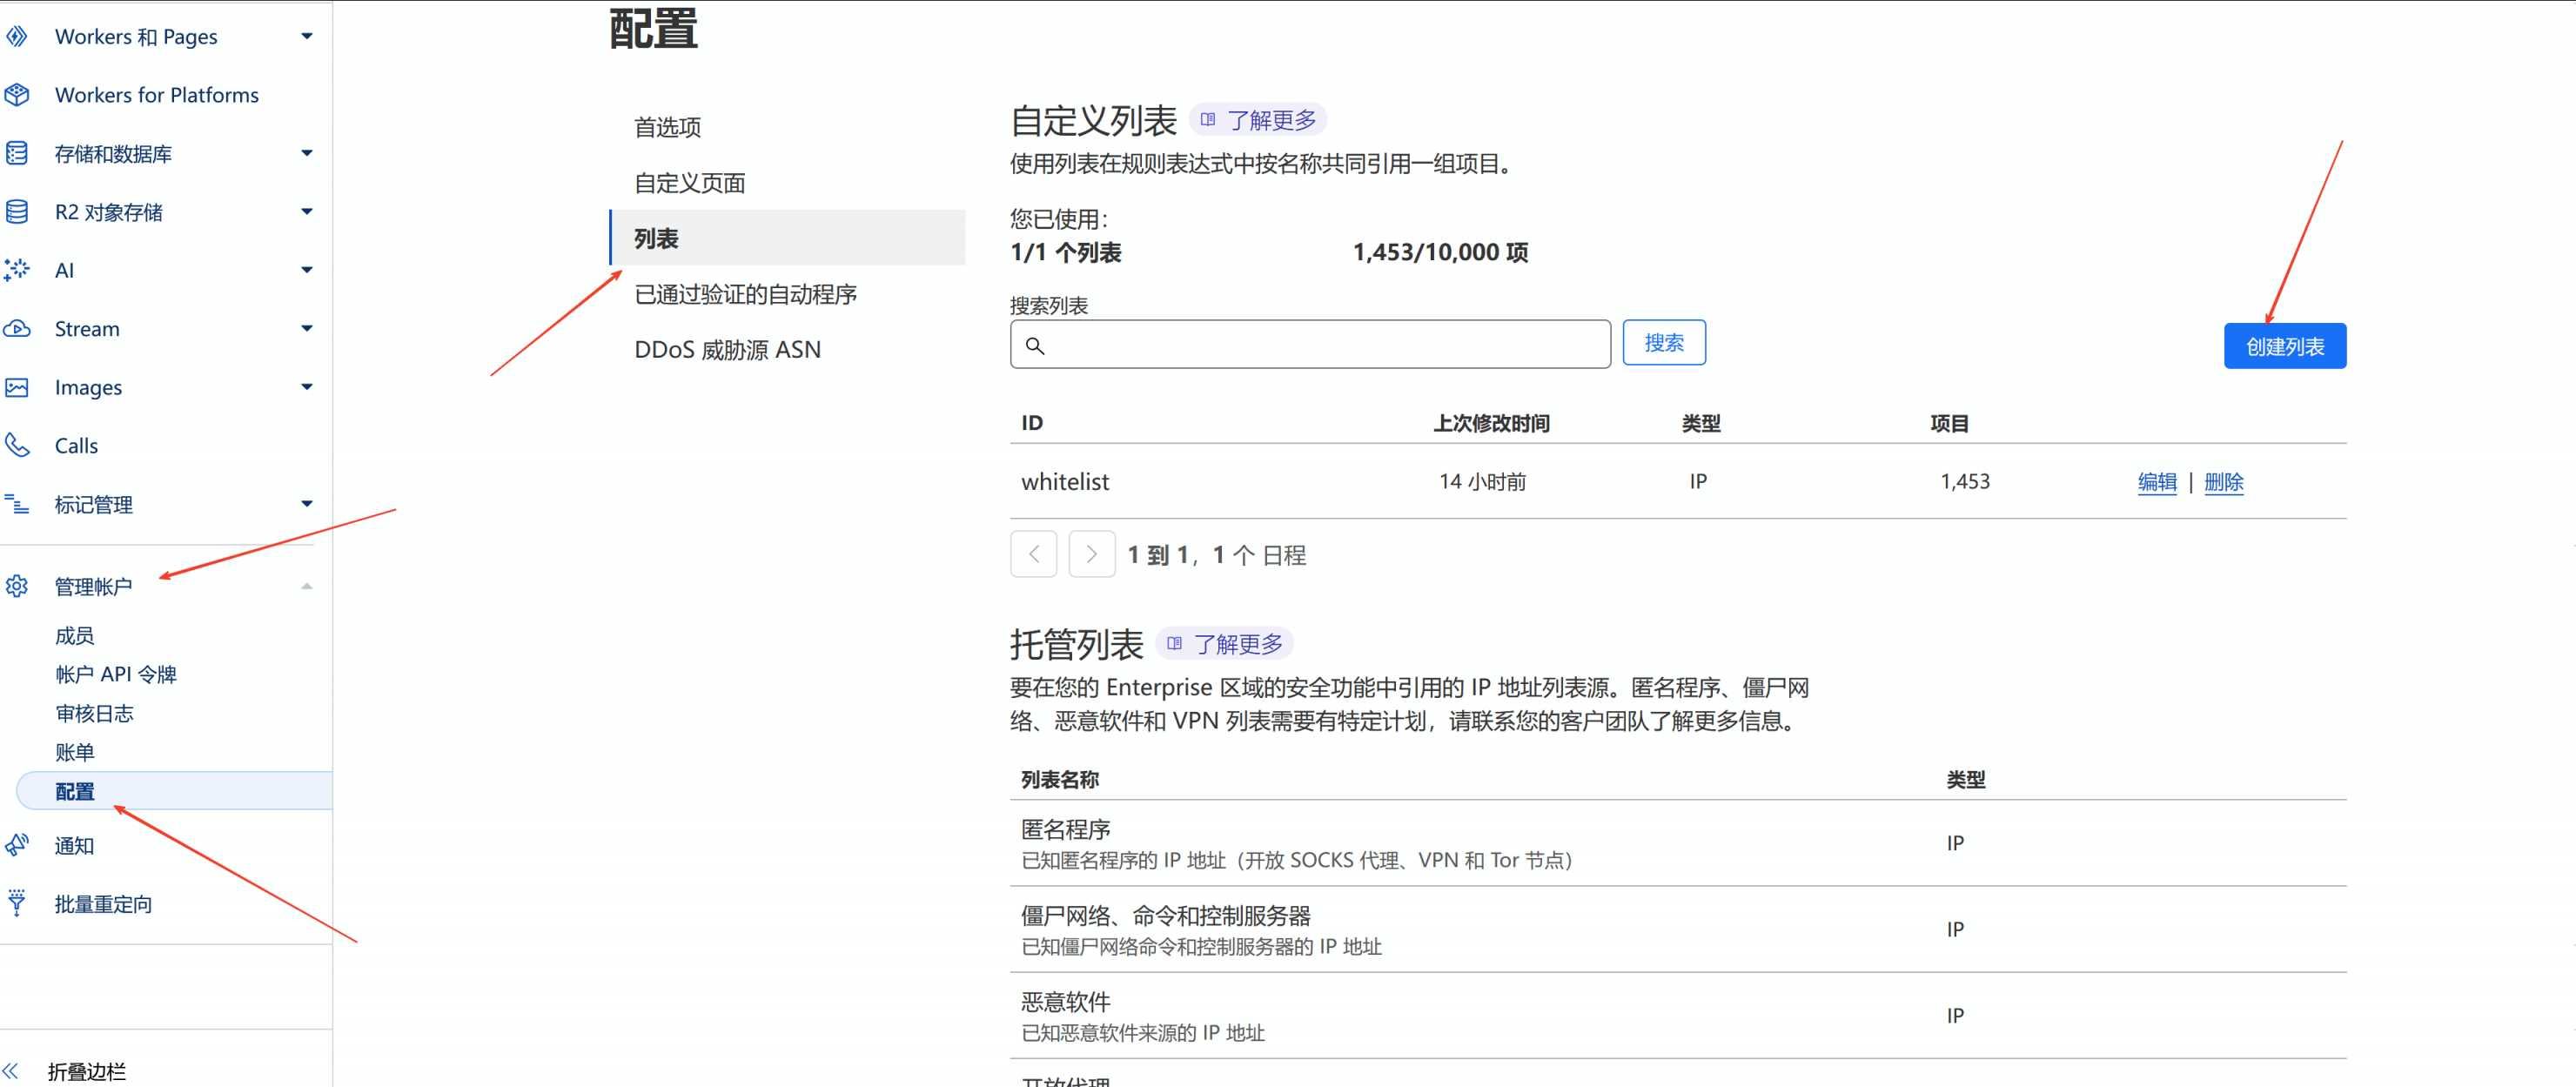
如果你的域名配置中开启了WAF,可以考虑把客户端的IP加入到WAF白名单以防被误拦截。
在账户管理界面创建白名单列表,点击添加项目。
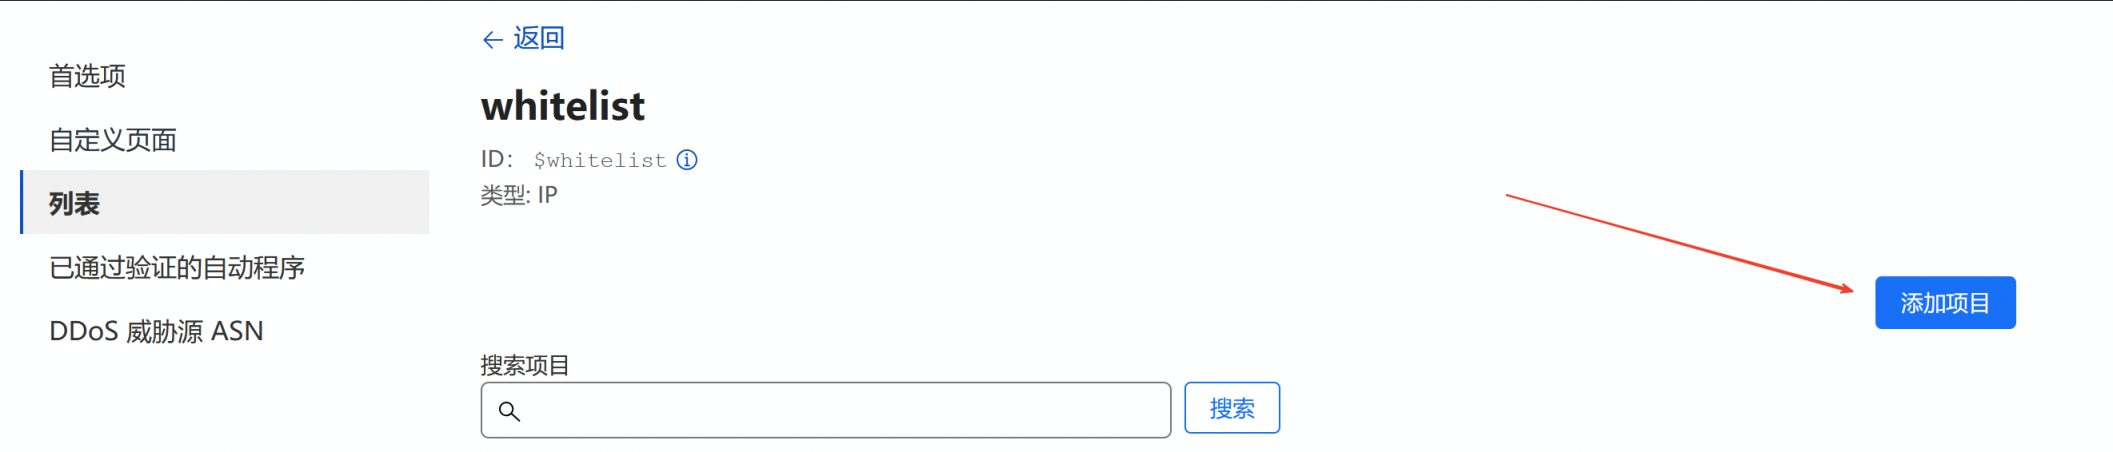
按照要求的格式添加客户端的IPv4和IPv6地址。

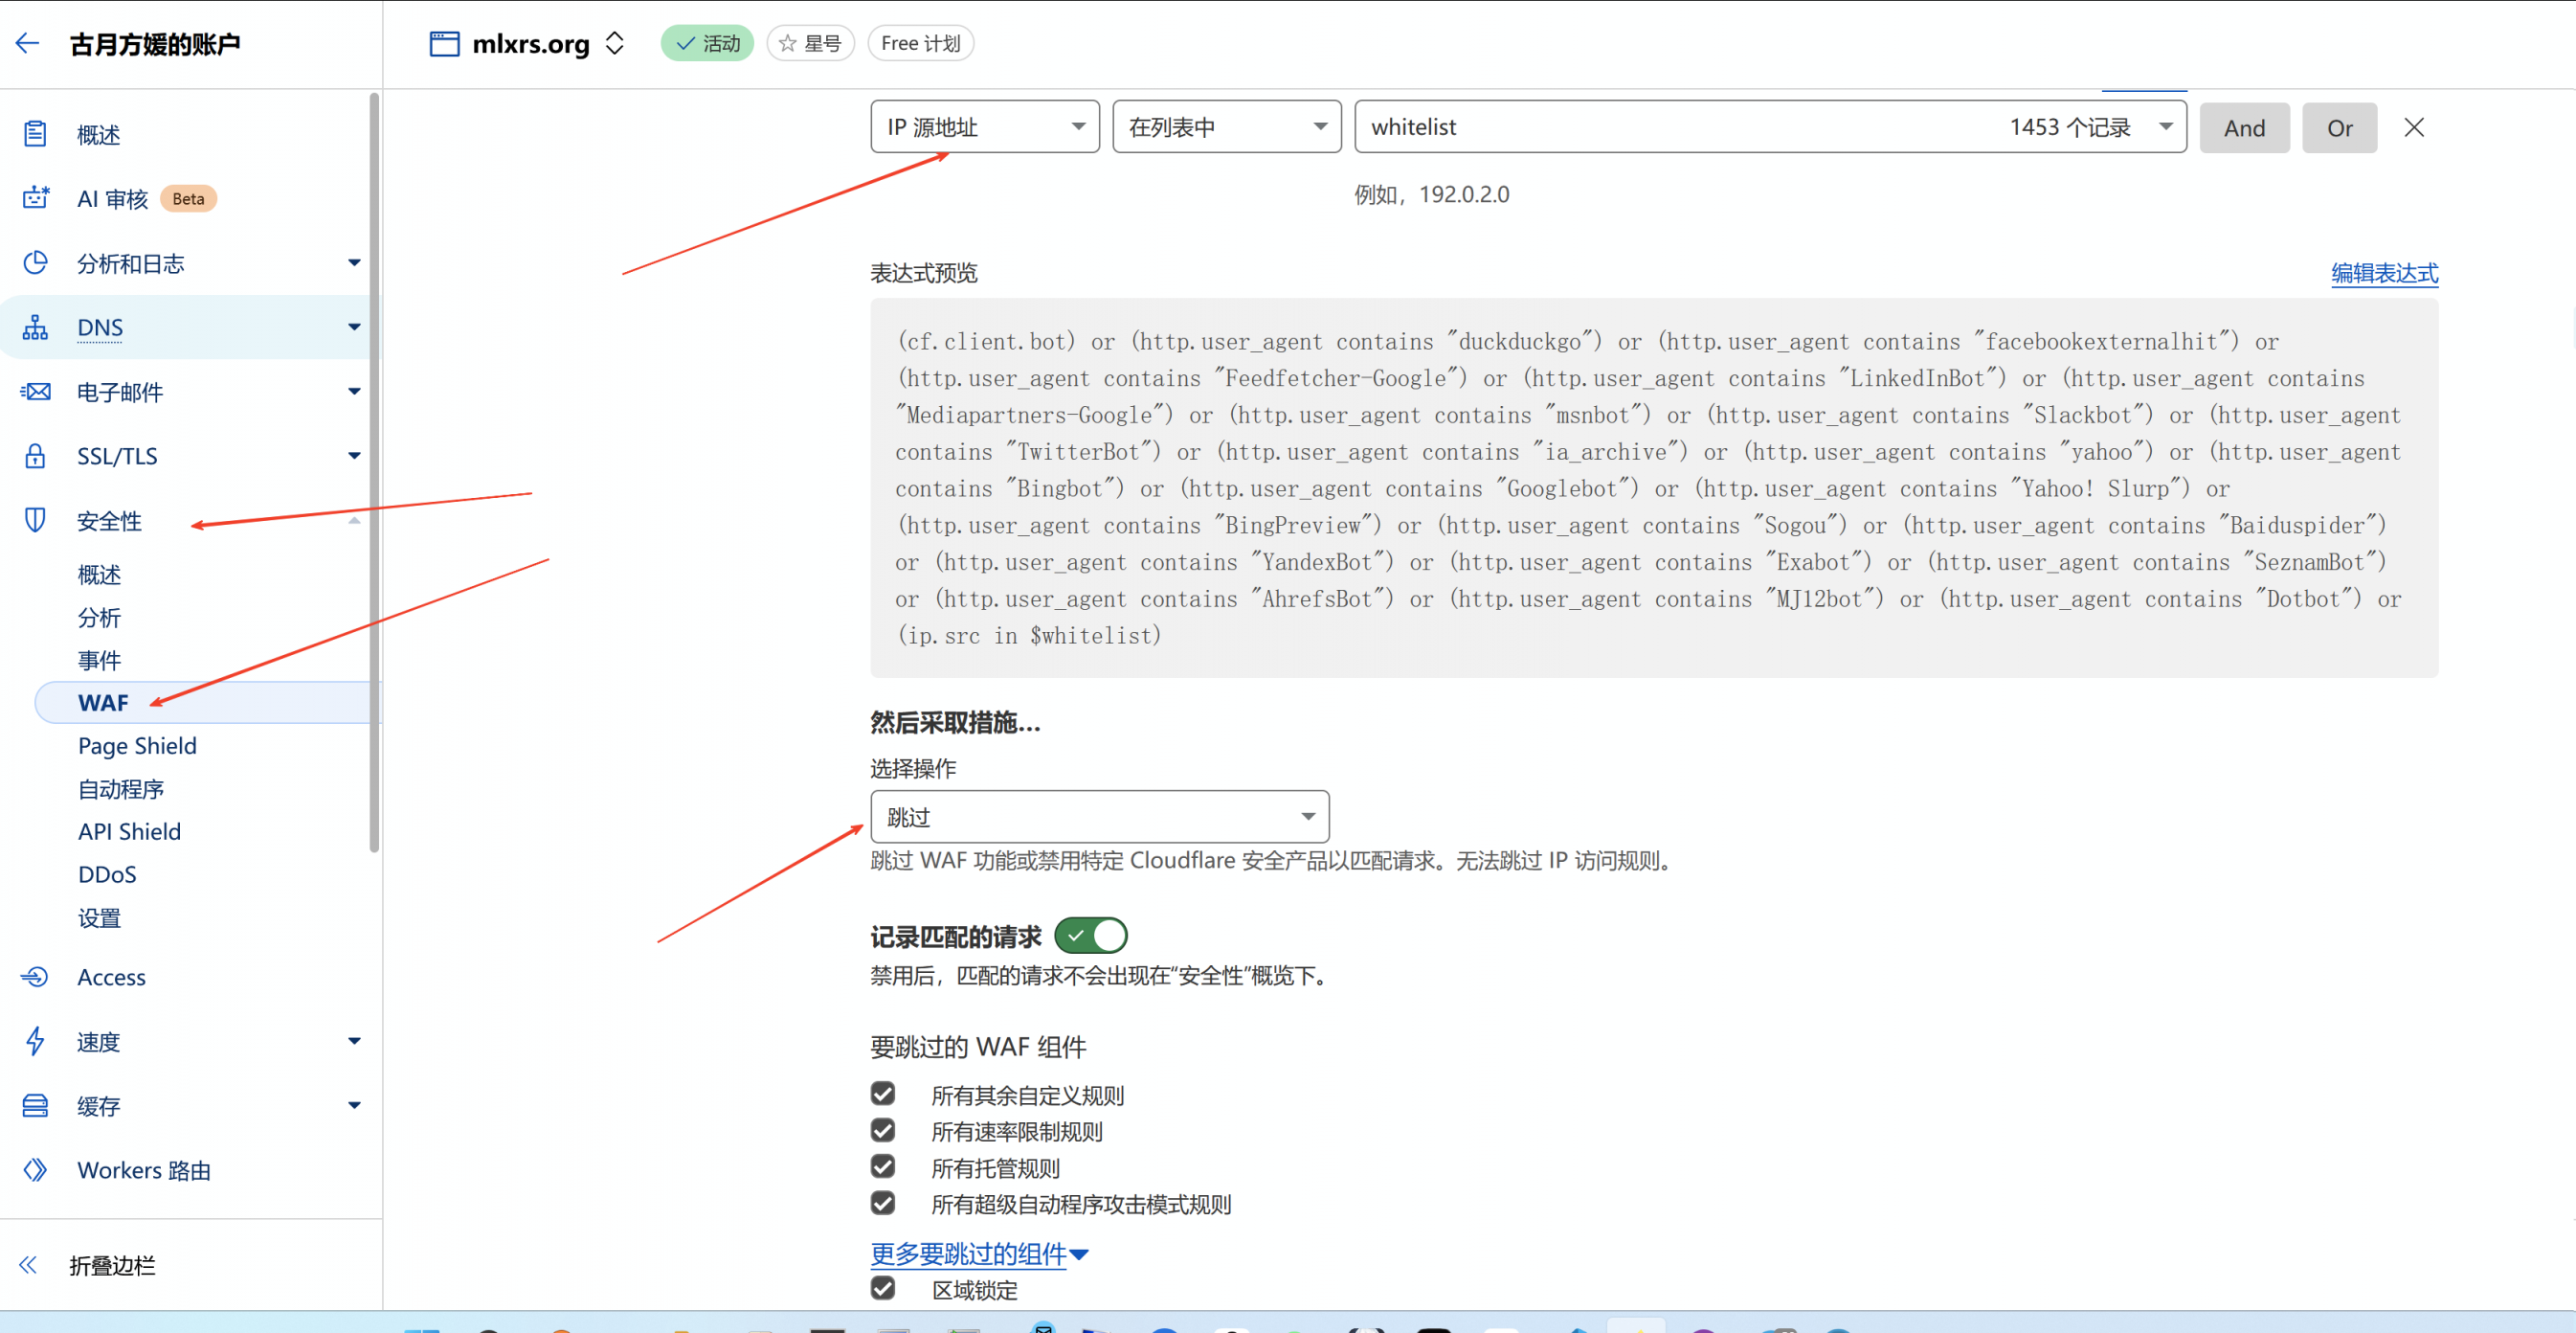
在安全性-WAF中添加一条规则,允许源地址为白名单成员的地址通过。
安装客户端
客户端使用官方服务管理脚本安装即可。
wget --no-check-certificate -qO status.sh 'https://raw.githubusercontent.com/zdz/ServerStatus-Rust/master/scripts/status.sh'
bash status.sh -i -c
运行后会要求你输入上线信息,格式如下
grpcs://cf_grpc.mlxrs.org -u h1 -p p1其中cf_grpc.mlxrs.org修改为自己的grpcs域名,-u后填写服务端配置的用户名,-p后填写服务端配置的密码,再次密码强调不可使用特殊符号。
可选配置
安装vnstat后,即使机器重启也不会重置流量使用情况,建议安装。
apt install -y vnstatnano /etc/systemd/system/stat_client.service修改客户端服务文件,在ExecStart一行最后加一个-n参数,然后systemctl daemon-reload重载配置,最后systemctl restart cloudflared重启服务。
ExecStart=/opt/ServerStatus/client/stat_client -a "http://127.0.0.1:8080/report" -u h6 -p 4iV58Zk3S5JWav -n