个人用VPS上手设置步骤
记录了个人用的VPS上线后需要进行的设置,他人仅供参考。
个人现在常用的环境是Debian12,部分小内存设备用的是Debian11,不过其实占用差不太多,其他发行版以下内容仅供参考。
(可选)DD系统
如果有隐私洁癖可以做,我个人一般很少DD系统,唯一一次DD系统就是为了把大盘鸡的分区改成lvm格式。
不同的厂商对于DD脚本的兼容性不一致,建议有DD需求的去网上搜搜有没有成功案例,不然D失败了可能会有点问题,尤其是各种大厂云。
需要注意的是,DD的时候一旦机器重启应尽快连上VNC,然后选择启动项,不然可能会进默认的PXE启动项。
SSH配置更改
有的厂商默认使用SSH密码登入,个人现在为了安全性基本都切换到密钥登入了,所以SSH上线后第一件事就是生成SSH密钥并更改默认SSH配置。
生成SSH公私钥,使用ssh-keygen命令生成,没有特殊需求一路回车就行。
root@host:~# ssh-keygen  <== 建立密钥对
Generating public/private rsa key pair.
Enter file in which to save the key (/root/.ssh/id_rsa): <== 按 Enter
Created directory '/root/.ssh'.
Enter passphrase (empty for no passphrase): <== 输入密钥锁码,或直接按 Enter 留空
Enter same passphrase again: <== 再输入一遍密钥锁码
Your identification has been saved in /root/.ssh/id_rsa. <== 私钥
Your public key has been saved in /root/.ssh/id_rsa.pub. <== 公钥允许上述命令后,将在允许的账户家目录下面的隐藏目录~/.ssh/中生成公私钥,公钥内容需要拷贝到.ssh/authorized_keys或.ssh/authorized_keys2文件中(SSH配置默认密钥文件),私钥请自己留存避免泄露。
root@host:~# ls -lh ~/.ssh/
total 12K
-rw------- 1 root root  569 Mar 21 22:03 authorized_keys
-rw------- 1 root root 2.6K Mar 21 22:03 id_rsa
-rw-r--r-- 1 root root 569 Mar 21 22:03 id_rsa.pub使用cp命令直接将id_rsa.pub文件覆盖authorized_keys,并授予600的权限保证只有所有者可读写,务必检查权限,错误会导致后续sshd重启时服务挂掉。
root@host:~# cd ~/.ssh/
root@host:~/.ssh# cp id_rsa.pub authorized_keys
root@host:~/.ssh# chmod 600 authorized_keys
root@host:~/.ssh# ls -lh authorized_keys
-rw------- 1 root root 569 Mar 26 10:43 authorized_keyscat读取id_rsa文件中的内容并将其复制到本地并妥善保存,或者使用SFTP直接拉取文件也可以。
使用nano /etc/ssh/sshd_config编辑配置文件,重点注意以下配置:
Port 22222:建议修改,防止SSH爆破,当然改为仅密钥登入后也没啥好爆破的,在防止SSH阻断方面也有一点点的用处,但不大。PermitRootLogin yes:允许root用户登入,默认配置。PermitRootLogin prohibit-password:root用户登入时禁止使用密码,默认配置。PasswordAuthentication no:无论什么用户都不允许使用密码登入。
sshd文件具体配置如下:
# This is the sshd server system-wide configuration file.  See
# sshd_config(5) for more information.

# This sshd was compiled with PATH=/usr/local/bin:/usr/bin:/bin:/usr/games

# The strategy used for options in the default sshd_config shipped with
# OpenSSH is to specify options with their default value where
# possible, but leave them commented.  Uncommented options override the
# default value.

Include /etc/ssh/sshd_config.d/*.conf

Port 22222
#AddressFamily any
#ListenAddress 0.0.0.0
#ListenAddress ::

#HostKey /etc/ssh/ssh_host_rsa_key
#HostKey /etc/ssh/ssh_host_ecdsa_key
#HostKey /etc/ssh/ssh_host_ed25519_key

# Ciphers and keying
#RekeyLimit default none

# Logging
#SyslogFacility AUTH
#LogLevel INFO

# Authentication:

#LoginGraceTime 2m
PermitRootLogin prohibit-password
#StrictModes yes
#MaxAuthTries 6
#MaxSessions 10

#PubkeyAuthentication yes

# Expect .ssh/authorized_keys2 to be disregarded by default in future.
#AuthorizedKeysFile     .ssh/authorized_keys .ssh/authorized_keys2

#AuthorizedPrincipalsFile none

#AuthorizedKeysCommand none
#AuthorizedKeysCommandUser nobody

# For this to work you will also need host keys in /etc/ssh/ssh_known_hosts
#HostbasedAuthentication no
# Change to yes if you don't trust ~/.ssh/known_hosts for
# HostbasedAuthentication
#IgnoreUserKnownHosts no
# Don't read the user's ~/.rhosts and ~/.shosts files
#IgnoreRhosts yes

# To disable tunneled clear text passwords, change to no here!
#PasswordAuthentication yes
#PermitEmptyPasswords no

# Change to yes to enable challenge-response passwords (beware issues with
# some PAM modules and threads)
KbdInteractiveAuthentication no

# Kerberos options
#KerberosAuthentication no
#KerberosOrLocalPasswd yes
#KerberosTicketCleanup yes
#KerberosGetAFSToken no

# GSSAPI options
#GSSAPIAuthentication no
#GSSAPICleanupCredentials yes
#GSSAPIStrictAcceptorCheck yes
#GSSAPIKeyExchange no

# Set this to 'yes' to enable PAM authentication, account processing,
# and session processing. If this is enabled, PAM authentication will
# be allowed through the KbdInteractiveAuthentication and
# PasswordAuthentication.  Depending on your PAM configuration,
# PAM authentication via KbdInteractiveAuthentication may bypass
# the setting of "PermitRootLogin prohibit-password".
# If you just want the PAM account and session checks to run without
# PAM authentication, then enable this but set PasswordAuthentication
# and KbdInteractiveAuthentication to 'no'.
UsePAM yes

#AllowAgentForwarding yes
#AllowTcpForwarding yes
#GatewayPorts no
X11Forwarding yes
#X11DisplayOffset 10
#X11UseLocalhost yes
#PermitTTY yes
PrintMotd no
#PrintLastLog yes
#TCPKeepAlive yes
#PermitUserEnvironment no
#Compression delayed
#ClientAliveInterval 0
#ClientAliveCountMax 3
#Usehost no
#PidFile /run/sshd.pid
#MaxStartups 10:30:100
#PermitTunnel no
#ChrootDirectory none
#VersionAddendum none

# no default banner path
#Banner none

# Allow client to pass locale environment variables
AcceptEnv LANG LC_*

# override default of no subsystems
Subsystem       sftp    /usr/lib/openssh/sftp-server

# Example of overriding settings on a per-user basis
#Match User anoncvs
#       X11Forwarding no
#       AllowTcpForwarding no
#       PermitTTY no
#       ForceCommand cvs server

PasswordAuthentication no
PermitRootLogin yes配置完毕后,使用systemctl reload sshd来重载SSH服务器配置。
root@host:~/.ssh# systemctl status sshd
● ssh.service - OpenBSD Secure Shell server
     Loaded: loaded (/lib/systemd/system/ssh.service; enabled; preset: enabled)
     Active: active (running) since Sat 2025-03-22 10:11:57 CST; 4 days ago
       Docs: man:sshd(8)
             man:sshd_config(5)
    Process: 1764801 ExecReload=/usr/sbin/sshd -t (code=exited, status=0/SUCCESS)
    Process: 1764802 ExecReload=/bin/kill -HUP $MAINPID (code=exited, status=0/SUCCESS)
   Main PID: 681 (sshd)
      Tasks: 1 (limit: 9483)
     Memory: 10.1M
        CPU: 1min 23.069s
     CGroup: /system.slice/ssh.service
             └─681 "sshd: /usr/sbin/sshd -D [listener] 0 of 10-100 startups"

Mar 26 10:52:34 host systemd[1]: Reloading ssh.service - OpenBSD Secure Shell server...
Mar 26 10:52:34 host sshd[681]: Received SIGHUP; restarting.
Mar 26 10:52:34 host systemd[1]: Reloaded ssh.service - OpenBSD Secure Shell server.
Mar 26 10:52:34 host sshd[681]: Server listening on 0.0.0.0 port 22222.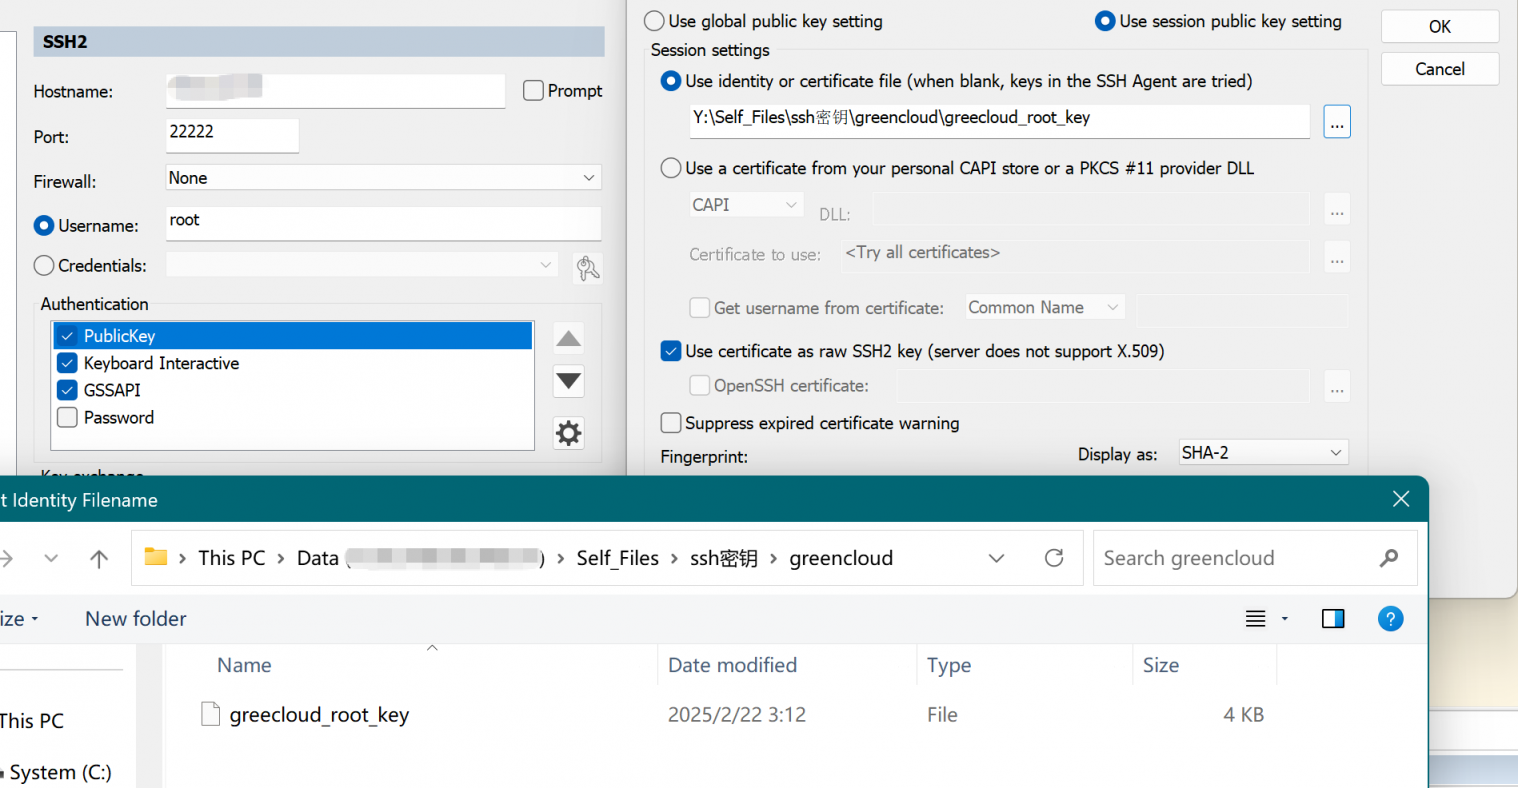
Mar 26 10:52:34 host sshd[681]: Server listening on :: port 22222.此时可以使用各类型SSH工具调用私钥登入,注意先别断开原先的ssh会话,不然一旦配置有问题你可能得进后台VNC改配置了。
需要注意的是,如果只想使用一个密钥来进行登入的话,可以保存公私钥对的具体内容,粘贴公钥内容到其他Linux的用户~/.ssh/目录下的authorized_keys中重启sshd服务即可。
安装防火墙
Debian12默认不安装防火墙,但是为了安全考虑我建议你安装本机防火墙,除非你的IDC提供了面板防火墙。
Debian12推荐安装ufw防火墙:
root@host:~# apt install -y ufwufw防火墙放通必要端口:
root@host:~# ufw allow 22222/tcp
Rules updated
Rules updated (v6)
root@host:~# ufw allow 80/tcp
Rules updated
Rules updated (v6)
root@host:~# ufw allow 443
Rules updated
Rules updated (v6)
请确保ssh端口放开后再启用ufw防火墙:
root@host:~# ufw enable
Command may disrupt existing ssh connections. Proceed with operation (y|n)? y
Firewall is active and enabled on system startup
查看ufw防火墙状态:
root@host:~# ufw status
Status: active

To                         Action      From
--                         ------      ----
22222/tcp                     ALLOW       Anywhere
80/tcp                     ALLOW       Anywhere
443                        ALLOW       Anywhere
22/tcp (v6)                ALLOW       Anywhere (v6)
安装Fail2ban
使用Fail2ban保护本机服务,如果没设置SSH仅密钥登入请务必安装Fail2ban并做相关配置。
root@host:~# apt install -y fail2ban使用nano /etc/fail2ban/jail.local编辑文件,将下列配置粘贴进配置文件:
[DEFAULT]
# 该标签下是对jail监狱规则进行全局配置,全局设置可以被覆盖
#...
# 被封禁的时间,默认以秒为单位,bantime = 10m 表示被封禁的时间为 10 分钟。
bantime  = 10m

# 用于确定是否封禁IP的时间段,以秒为单位。findtime = 10m表示在过去的10分钟内进行的登录失败大于等于maxretry次数将被封禁。
findtime  = 10m

# 允许的最大登录失败次数,如果在findtime时间段内某个IP地址的登录失败次数达到或超过maxretry次,该IP地址将被封禁。
maxretry = 5

# "maxmatches" is the number of matches stored in ticket (resolvable via tag <matches> in actions).
maxmatches = %(maxretry)s

# 用于获取文件修改的后端。这个选项指定了 Fail2ban 使用的监视文件变化的机制。
# 可以选择的后端包括:pyinotify、gamin、polling、systemd 和 auto。
# 如果未指定后端,Fail2ban 将尝试按照顺序使用这些后端,直到找到可用的后端为止。
# backend = auto 表示 Fail2ban 将尝试使用pyinotify、gamin、polling、systemd这几种后端中的一种。
backend = auto

# 启用ssh
[sshd]
# 使用ufw封禁ip
banaction = ufw
banaction_allports = ufw

# 客户端主机被禁止的时长 单位:秒
bantime = 3600

# 客户端主机被禁止前允许失败的次数
maxretry = 3

# 查找失败次数的时长 单位:秒
findtime = 600

backend = systemd
enable=true随后systemctl reload fail2ban.service重载服务,使用fail2ban-client status sshd查看封禁情况。
root@host:~/.ssh# systemctl reload fail2ban.service
root@host:~/.ssh# fail2ban-client status sshd
Status for the jail: sshd
|- Filter
|  |- Currently failed: 0
|  |- Total failed:     4725
|  `- File list:        /var/log/auth.log
`- Actions
   |- Currently banned: 0
   |- Total banned:     797
   `- Banned IP list:
启用BBR
BBR能有效提升网络吞吐量并增强高延迟下TCP的表现,对于境外的VPS网络性能有较大提升。
Linux在4.9以上的内核都自带BBR,最新版Debian11和12也是如此,可以使用uname -r命令查看:
root@host:~# uname -r
5.10.0-34-amd64  <==大于4.9就行
Debian11和12的内核默认带有BBR但是没有开启,通过以下命令开启BBR:
echo "net.core.default_qdisc=fq" >> /etc/sysctl.conf

echo "net.ipv4.tcp_congestion_control=bbr" >> /etc/sysctl.conf通过sysctl -p应用变更。
root@host:~# sysctl -p
net.core.default_qdisc = fq
net.ipv4.tcp_congestion_control = bbr通过lsmod | grep bbr验证变更是否生效。
root@host:~# lsmod | grep bbr
tcp_bbr                20480  47
(可选)启用BBRx
只有在邻居都比较狠的情况下才需要用到BBRx,例如Netcup或者HZ这种PT大户比较多的商家。
可以使用开源一键脚本安装,感谢大佬的付出造福了我这种懒狗,注意安装完毕后会提示重启,reboot即可。
bash <(wget -qO- https://raw.githubusercontent.com/jerry048/Tune/main/tune.sh) -x设定时区
timedatectl set-timezone Asia/Shanghai设定时区为Asia/Shanghai 。
root@host:~# timedatectl set-timezone Asia/Shanghai
root@host:~# timedatectl
               Local time: Wed 2025-03-26 17:53:25 CST
           Universal time: Wed 2025-03-26 09:53:25 UTC
                 RTC time: Wed 2025-03-26 09:53:25
                Time zone: Asia/Shanghai (CST, +0800)
System clock synchronized: yes
              NTP service: active
          RTC in local TZ: no
更改DNS
有的商家安装完镜像后使用的是商家自己的DNS服务器,建议改成公共DNS,以免发生解析问题。
国内云的除外,因为可能有一些服务依赖内网DNS,例如厂商自己的docker镜像加速。
编辑/etc/resolv.conf,如果提示不可用大概率是被赋予了i属性,使用lsattr /etc/resolv.conf命令查看:
root@host:~# lsattr /etc/resolv.conf
----i---------e------- /etc/resolv.conf如果确认了有i属性,请尝试用chattr -i /etc/resolv.conf命令去除该属性:
root@host:~# chattr -i /etc/resolv.conf
root@host:~# lsattr /etc/resolv.conf
--------------e------- /etc/resolv.conf将/etc/resolv.conf 文件内容更改为:
nameserver 1.1.1.1
nameserver 8.8.8.8
nameserver 9.9.9.9随后使用chattr +i /etc/resolv.conf命令重新赋予i属性以免该文件被篡改:
root@host:~# chattr +i /etc/resolv.conf
root@host:~# lsattr /etc/resolv.conf
----i---------e------- /etc/resolv.conf
添加Swap
小内存的VPS推荐添加Swap,尤其是有高速SSD的VPS。
Swap的大小按照Redhat的推荐如下,翻译一下就是
2G以内的物理内存,SWAP 设置为内存的2倍。
2-8G的物理内存,SWAP 等于内存大小。
8G以上物理内存,SWAP 设置为至少4G。
分配Swap的具体的命令如下所示。
#分配1G大小的Swap文件
fallocate -l 3G /swapfile
#赋予600权限仅限root可读写
chmod 600 /swapfile
#申明swapfile为swap文件
mkswap /swapfile
#启用swap
swapon /swapfile
#查看swap状态
swapon -s
#开机挂载swap
echo "/swapfile swap swap defaults 0 0" >> /etc/fstab
(可选)安装并开启Zram
如果VPS的性能比较强,可以考虑开启Zram来压缩内存提高内存利用率。
root@host:~# apt install -y zram-tools 配置文件默认保存在/etc/default/zramswap,可以使用nano编辑:
root@host:~# nano /etc/default/zramswap
root@host:~# cat /etc/default/zramswap
# Compression algorithm selection
# speed: lz4 > zstd > lzo
# compression: zstd > lzo > lz4
# This is not inclusive of all that is available in latest kernels
# See /sys/block/zram0/comp_algorithm (when zram module is loaded) to see
# what is currently set and available for your kernel[1]
# [1]  https://github.com/torvalds/linux/blob/master/Documentation/blockdev/zram.txt#L86
ALGO=zstd

# Specifies the amount of RAM that should be used for zram
# based on a percentage the total amount of available memory
# This takes precedence and overrides SIZE below
PERCENT=50

# Specifies a static amount of RAM that should be used for
# the ZRAM devices, this is in MiB
#SIZE=256

# Specifies the priority for the swap devices, see swapon(2)
# for more details. Higher number = higher priority
# This should probably be higher than hdd/ssd swaps.
#PRIORITY=100随后使用systemctl reload zramswap.service重载配置。
root@host:~# systemctl reload zramswap.service
root@host:~# systemctl status zramswap.service
● zramswap.service - Linux zramswap setup
     Loaded: loaded (/lib/systemd/system/zramswap.service; enabled; preset: enabled)
     Active: active (exited) since Sat 2025-03-22 10:11:55 CST; 4 days ago
       Docs: man:zramswap(8)
    Process: 2230276 ExecReload=/usr/sbin/zramswap restart (code=exited, status=0/SUCCESS)
   Main PID: 483 (code=exited, status=0/SUCCESS)
        CPU: 4.200s

Mar 22 10:11:55 host systemd[1]: Starting zramswap.service - Linux zramswap setup...
Mar 22 10:11:55 host root[489]: Starting Zram
Mar 22 10:11:55 host zramswap[489]: <13>Mar 22 10:11:55 root: Starting Zram
Mar 22 10:11:55 host zramswap[503]: Setting up swapspace version 1, size = 3.9 GiB (4163227648 bytes)
Mar 22 10:11:55 host zramswap[503]: no label, UUID=37981228-ec57-4400-9c1f-aaf48cbe9160
Mar 22 10:11:55 host systemd[1]: Finished zramswap.service - Linux zramswap setup.
Mar 26 18:29:15 host systemd[1]: Reloading zramswap.service - Linux zramswap setup...
Mar 26 18:29:20 host zramswap[2230347]: Setting up swapspace version 1, size = 3.9 GiB (4163227648 bytes)
Mar 26 18:29:20 host zramswap[2230347]: no label, UUID=96e58963-5de0-4bda-bb2c-2d3cee8eccf1
Mar 26 18:29:20 host systemd[1]: Reloaded zramswap.service - Linux zramswap setup.
(可选)安装docker组件
docker安装参考该网站,使用官方一键安装脚本即可。
 curl -fsSL https://get.docker.com -o get-docker.sh
sudo sh get-docker.sh如果非root用户要使用docker,要么使用sudo命令提权,要么将该用户加入docker组,后者请参考该文章,不重复造轮子了。
sudo groupadd docker
sudo usermod -aG docker $USER
newgrp docker
docker run hello-world新版本已经自带docker compose命令无需下载docker-compose组件了。
root@host:~# docker compose version
Docker Compose version v2.34.0
(可选)测试脚本合集
不会有人买鸡不跑脚本看性能吧。
跑个融合怪可以让你更清晰得了解机器的性能,建站需要关心CPU跑分,内存跑分和硬盘IO,其他用途(懂得都懂)可能更需要关心网络质量。
融合怪脚本
一个高大全脚本,自动配置测试软件,交互界面进去无脑选高大全就完事了。
curl -L https://gitlab.com/spiritysdx/za/-/raw/main/ecs.sh -o ecs.sh && chmod +x ecs.sh && bash ecs.shNodeQuality脚本
同样也是高大全,Nodeseek论坛官方推的脚本,特点是无痕测试,并使用基准的debian作为测试底层,理论上可比性更强。融合了网络质量检测脚本,消耗的流量很多,使用需要慎重。
bash <(curl -sL https://run.NodeQuality.com)网络质量检测脚本
同样发布再Nodeseek论坛的脚本,先已被融合进NodeQuality脚本,但是如果只想看网络质量可以用这个脚本做参考,消耗的流量很多,使用需要慎重。
bash <(curl -sL Net.Check.Place)